1、在 package.json 中配置
2、在根目录,新建 vue.config.js
1 | modeule.exports = { |
示例:
1 | module.exports = { |
3、 babel.config.js
1、在 package.json 中配置
2、在根目录,新建 vue.config.js
1 | modeule.exports = { |
示例:
1 | module.exports = { |
3、 babel.config.js
Ubuntu 20.04 可运行 sudo apt isntall mysql-server 命令直接安装。
1 | CREATE USER 'pma'@'localhost' IDENTIFIED WITH caching_sha2_password BY 'pmapass'; |
https://dev.mysql.com/downloads/
https://dev.mysql.com/downloads/mysql/
https://dev.mysql.com/doc/refman/8.0/en/
https://dev.mysql.com/doc/refman/8.0/en/binary-installation.html
https://dev.mysql.com/doc/mysql-apt-repo-quick-guide/en/
推荐安装在 /usr/local 目录
1 | tar -xvf mysql_8.tar.xz //解压 tar.xz 文件 |
https://www.cnblogs.com/keme/p/10288168.html
APT 安装:
https://blog.csdn.net/wm609972715/article/details/83759266
如何在Ubuntu 18.04中安装MySQL 8.0数据库服务器_数据库技术_Linux公社-Linux系统门户网站 (linuxidc.com)
Ubuntu中更改MySQL数据库文件目录:
1 | service mysql stop |
1 | vim /etc/apparmor.d/usr.sbin.mysqld |
1 | service apparmor restart |
Supervisor 是一款使用 Python 开发的非常优秀的进程管理工具。它可以在类 UNIX 系统上让用户精确地监视与控制多组指定数量的服务进程。当监控的服务进程意外退出时,会尝试自动重启这些服务,以保持服务可用状态。
Supervisor 官方 提供的安装方式较多,这里采用 pip 方式安装。
1 | $ yum install python-pip# 升级pip$ pip install --upgrade pip$ pip -Vpip 9.0.1 |
通过 pip 安装 Supervisor:
1 | $ pip install supervisorSuccessfully installed supervisor-3.3.3 |
安装 Supervisor 后,会出现 supervisorctl 和 supervisord 两个程序,其中 supervisorctl 为服务监控终端,而 supervisord 才是所有监控服务的大脑。查看 supervisord 是否安装成功:
1 | $ supervisord -v3.3.3 |
将 supervisord 配置成开机启动服务,下载官方 init 脚本。
修改关键路径配置:
1 | PIDFILE=/var/run/supervisord.pid |
移到该文件到/etc/init.d目录下,并重命名为 supervisor,添加可执行权限:
1 | $ chmod 777 /etc/init.d/supervisor |
配置成开机启动服务:
1 | $ chkconfig --add supervisor |
Supervisord 安装后,需要使用如下命令生成配置文件。
1 | $ mkdir /etc/supervisor |
supervisord.conf的主配置部分说明:
1 | [unix_http_server] |
这部分我们不需要做太多的配置修改,如果需要开启 WEB 终端监控,则需要配置并开启 inet_http_server 项。
Supervisor 需管理的进程服务配置,示例如下:
1 | [program:work] ; 服务名,例如work |
通常将每个进程的配置信息配置成独立文件,并通过 include 模块包含,这样方便修改和管理配置文件。
配置完成后,启动 supervisord 守护服务:
1 | $ supervisord -c /etc/supervisor/supervisord.conf |
常用的命令参数说明:
查看 supervisord 启动情况:
1 | $ ps -ef | grep "supervisor" |
Supervisor 提供了多种监控服务的方式,包括 supervisorctl 命令行终端、Web 端、XML_RPC 接口多种方式。
直接使用 supervisorctl 即可在命令行终端查看所有服务的情况,如下:
1 | $ supervisorctl |
supervisorctl 常用命令列表如下;
在配置中开启 inet_http_server 后,即可通过 Web 界面便捷地监控进程服务了。
来源:
The methods which begin with two underscores (__) are called Magic Methods in PHP, and they play an important role. Magic methods include:
| Method Name | Description |
|---|---|
| __construct() | the constructor of a class |
| __destruct() | the destructor of a class |
| __call($funName, $arguments) | The __call() method will be called when an undefined or inaccessible method is called. |
| __callStatic($funName, $arguments) | The __callStatic() method will be called when an undefined or inaccessible static method is called. |
| __get($propertyName) | The __get() method will be called when getting a member variable of a class. |
| __set($property, $value) | The __set() method will be called when setting a member variable of a class. |
| __isset($content) | The __isset() method will be called when calling isset() or empty() for an undefined or inaccessible member. |
| __unset($content) | The __unset() method will be called when calling reset() for an undefined or inaccessible member. |
| __sleep() | The __sleep() method will be called first when executing serialize(). |
| __wakeup() | The __wakeup() method will be called first when deserialization() is executed. |
| __toString() | The __toString() method will be called when using echo method to print an object directly. |
| __invoke() | The __invoke() method will be called when trying to call an object in a way of calling function. |
| __set_state($an_array) | The __set_state() method will be called when calling var_export(). |
| __clone() | The __clone() method will be called when the object is copied. |
| __autoload($className) | Try to load an undefined class. |
| __debugInfo() | Print debug information. |
In this article, we will show you how to use these PHP magic methods with some examples.
The PHP constructor is the first method that is automatically called after the object is created. Each class has a constructor. If you do not explicitly declare it, then there will be a default constructor with no parameters and empty content in the class.
Constructors are usually used to perform some initialization tasks, such as setting initial values for member variables when creating objects.
1 | function __constrct([parameter list]){ |
Note: Only one constructor can be declared in the same class, because PHP does not support constructor overloading.
Here is a complete example:
1 |
|
Create object $Person1 without any parameters.
1 | $Person1 = new Person(); |
Create object $Person2 with parameter “Jams”.
1 | $Person2 = new Person("Jams"); |
Create object $Person3 with three parameters.
1 | $Person3 = new Person ("Jack", "Male", 25); |
Now that we have already known what the constructor is, the destructor is the opposite.
Destructor allows you to perform some operations before destroying an object, such as closing a file, emptying a result set, and so on.
Destructor is a new feature introduced by PHP5.
The declaration format of the destructor is similar to that of the constructor __construct(), which means that __destruct() is also started with two underscores, and the name of the destructor is also fixed.
1 | function __destruct() |
Note: Destructor cannot have any parameters.
In general, the destructor is not very common in PHP. It’s an optional part of a class, usually used to complete some cleanup tasks before the object is destroyed.
Here is an example of using the destructor:
1 |
|
The output of the program above is:
1 | Well, my name is John |
This method takes two parameters. The first parameter $function_name will automatically receive the undefined method name, while the second $arguments will receive multiple arguments of the method as an array.
1)The use of __call() method
1 | function __call(string $function_name, array $arguments) |
When an undefined method is called in a program, the __call() method will be called automatically.
Here is an example:
1 | <?php |
The results are as follows:
1 | The function you called: run (parameter: Array([0] => teacher)) does not exist! |
When an undefined static method is called in a program, the __callStatic() method will be called automatically.
The use of __callStatic() is similar to the __call(). Here is an example:
1 |
|
The results are as follows:
1 | The static method you called: run (parameter: Array([0] => teacher)) does not exist! |
When you try to access a private property of an external object in a program, the program will throw an exception and end execution. We can use the magic method __get() to solve this problem. It can get the value of the private property of the object outside the object. Here is an example:
1 |
|
The results are as follows:
1 | Name: John |
The __set( $property, $value) method is used to set the private property of the object. When an undefined property is assigned, the __set() method will be triggered and the passed parameters are the property name and value that are set.
Here is the demo code:
1 |
|
Here is the result:
1 | My name is Lili, I'm 16 years old |
Before using the __isset () method, let me explain the use of the isset () method first. The isset () method is mainly used to determine whether the variable is set.
If you use the isset() method outside the object, there are two cases:
So for the private property, is there any way to know if it is set? Of course, as long as we define a __isset() method in a class, we can use the isset() method outside the class to determine whether the private property is set or not.
When the isset() or empty() is called on an undefined or inaccessible property, the __isset() method will be called. Here is an example:
1 |
|
The results are as follows:
1 | 1 |
Similar to the __isset() method, the __unset() method is called when the unset() method is called on an undefined or inaccessible property. Here is an example:
1 |
|
The results are as follows:
1 | It is called automatically when we use the unset() method outside the class. |
The serialize() method will check if there is a magic method __sleep() in the class. If it exists, the method will be called first and then perform the serialize operation.
The __sleep() method is often used to specify the properties that need to be serialized before saving data. If there are some very large objects that don’t need to be saved all, then you will find this feature is very useful.
For details, please refer to the following code:
1 |
|
The results are as follows:
1 | It is called when the serialize() method is called outside the class. |
In contrast to the __sleep() method, the __wakeup() method is often used in deserialize operations, such as re-building a database connection, or performing other initialization operations.
Here is an example:
1 |
|
The results are as follows:
1 | It is called when the serialize() method is called outside the class. |
The __toString() method will be called when using echo method to print an object directly.
Note: This method must return a string, otherwise it will throw a fatal error at E_RECOVERABLE_ERROR level. And you also can’t throw an exception in the __toString() method.
Here is an example:
1 |
|
The results are as follows:
1 | go go go |
So what if the __toString() method is not defined in the class? Let’s have a try.
1 |
|
The results are as follows:
1 | Catchable fatal error: Object of class Person could not be converted to string in D:\phpStudy\WWW\test\index.php on line 18 |
Obviously, It reports a fatal error on the page, which is not allowed by PHP syntax.
When you try to call an object in the way of calling a function, the __ invoke() method will be called automatically.
Note: This feature is only valid in PHP 5.3.0 and above.
Here is an example:
1 | <?php |
Here is the result:
1 | This is an object |
If you insist on using objects as methods(but not defining the __invoke() method),then you will get the following result:
1 | Fatal error: Function name must be a string in D:\phpStudy\WWW\test\index.php on line 18 |
Starting from PHP 5.1.0, the __set_state() method is called automatically when calling var_export() to export the class code.
The parameters of the __set_state() method is an array containing the values of all the properties, with the format of array(‘property’ => value,…)
We don’t define __set_state() method in the following example:
1 |
|
Here is the result:
1 | Person::__set_state(array( 'sex' => 'Male', 'name' => 'John', 'age' => 25, )) |
Obviously, the properties of the object are printed.
Now let’s have a look at the other case of being defined the __set_state() method:
1 |
|
Here is the result:
1 | Person::__set_state(array( 'sex' => 'Male', 'name' => 'Jams', 'age' => 25, )) |
In PHP we can use the clone keyword to copy objects with the following syntax:
1 | $copy_of_object = clone $object; |
However, using clone keyword is just a shallow copy, because all referenced properties will still point to the original variable.
If a __clone() method is defined in a object, then the __clone() method will be called in the copy-generated object and can be used to modify the value of the property (if necessary).
Here is an example:
1 |
|
The results are as follows:
1 | Person::__clone your are cloning the object. |
The __autoload() method can try to load an undefined class.
In the past, if you were to create 100 objects in a program file, then you had to use include() or require() to contain 100 class files, or you had to define the 100 classes in the same class file, for example:
1 | /** |
So what if we use the __autoload() method?
1 | /** |
When the PHP engine uses class A at the first time, if class A is not found, then the __autoload method will be called automatically and the class name “A” will be passed as a parameter. So what we need to do in the __autoload() method is to find the corresponding class file based on the class name and then include the file. If the file is not found, then the php engine will throw an exception.
The __debugInfo() method will be called when the var_dump() method is executed. If the __debugInfo() method is not defined, then the var_dump() method will print out all the properties in the object.
Here is an example:
1 |
|
Here is the result:
1 | object(C)#1 (1) { ["propSquared"]=> int(1764) } |
Note: The __debugInfo() method should be applied to the PHP 5.6.0 and above.
The above are the PHP magic methods that I understand, of which commonly used include __set(), __get() and __autoload(). If you still have any questions, you can get more help from the official PHP website.
来源:
https://www.tutorialdocs.com/article/16-php-magic-methods.html
In my previous article I explained why everyone should use ProGuard for their Android apps, how to enable it and what kind of errors you might encounter when doing so. There was a lot of theory involved, as I think it’s important to understand the underlying principles in order to be prepared to deal with any potential problems.
I also talked in a separate article about the very specific problem of configuring ProGuard for an Instant App build.
In this part, I’d like to talk about the practical examples of ProGuard rules on a medium sized sample app: Plaid by Nick Butcher.
Plaid actually turned out to be a great subject for researching ProGuard problems, as it contains a mix of 3rd party libraries that use things like annotation processing and code generation, reflection, java resource loading and native code (JNI). I extracted and jotted down some practical advice that should apply to other apps in general:
1 | public class User { |
Probably every app has some kind of data class (also known as DMOs, models, etc. depending on context and where they sit in your app’s architecture). The thing about data objects is that usually at some point they will be loaded or saved (serialized) into some other medium, such as network (an HTTP request), a database (through an ORM), a JSON file on disk or in a Firebase data store.
Many of the tools that simplify serializing and deserializing these fields rely on reflection. GSON, Retrofit, Firebase — they all inspect field names in data classes and turn them into another representation (for example: {“name”: “Sue”, “age”: 28}), either for transport or storage. The same thing happens when they read data into a Java object — they see a key-value pair “name”:”John” and try to apply it to a Java object by looking up a String name field.
Conclusion: We cannot let ProGuard rename or remove any fields on these data classes, as they have to match the serialized format. It’s a safe bet to add a @Keep annotation on the whole class or a wildcard rule on all your models:
1 | -keep class io.plaidapp.data.api.dribbble.model.** { *; } |
Warning*: It’s possible to make a mistake when testing if your app is susceptible to this issue. For example, if you serialize an object to JSON and save it to disk in version N of your app without the proper keep rules, the saved data might look like this:*
*{“a”: “Sue”, “b”: 28}*. Because ProGuard renamed your fields to*a*and*b*, everything will seem to work, data will be saved and loaded correctly.However, when you build your app again and release version N+1 of your app, ProGuard might decide to rename your fields to something different, such as
*c*and*d*. As a result, data saved previously will fail to load.You *must* ensure you have the proper keep rules in the first place.
Android’s default ProGuard files (you should always include them, they have some really useful rules) already contain a rule for methods that are implemented on the native side (-keepclasseswithmembernames class * { native ; }). Unfortunately there is no catch-all way to keep code invoked in the opposite direction: from JNI into Java.
With JNI it’s entirely possible to construct a JVM object or find and call a method on a JVM handle from C/C++ code and in fact, one of the libraries used in Plaid does that.
Conclusion: Because ProGuard can only inspect Java classes, it will not know about any usages that happen in native code. We must explicitly retain such usages of classes and members via a @Keep annotation or -keep rule.
1 | -keep, includedescriptorclasses |
Android has its own resources and assets system that normally shouldn’t be a problem for ProGuard. However, in plain Java there is another mechanism for loading resources straight from a JAR file and some third-party libraries might be using it even when compiled in Android apps (in that case they will try to load from the APK).
The problem is that usually these classes will look for resources under their own package name (which translates to a file path in the JAR or APK). ProGuard can rename package names when obfuscating, so after compilation it might happen that the class and its resource file are no longer in the same package in the final APK.
To identify loading resources in this way, you can look for calls to Class.getResourceAsStream / getResource and ClassLoader.getResourceAsStream / getResource in your code and in any third party libraries you depend on.
Conclusion: We should keep the name of any class that loads resources from the APK using this mechanism.
In Plaid, there are actually two — one in the OkHttp library and one in Jsoup:
1 | -keepnames class okhttp3.internal.publicsuffix.PublicSuffixDatabase |
In an ideal world, every dependency you use would supply their required ProGuard rules in the AAR. Sometimes they forget to do this or only publish JARs, which don’t have a standardized way to supply ProGuard rules.
In that case, before you start debugging your app and coming up with rules, remember to check the documentation. Some library authors supply recommended ProGuard rules (such as Retrofit used in Plaid) which can save you a lot of time and frustration. Unfortunately, many libraries don’t (such as is the case with Jsoup and Bypass mentioned in this article). Also be aware that in some cases the config supplied with the library will only work with optimizations disabled, so if you are turning them on you might be in uncharted territory.
So how to come up with rules when the library doesn’t supply them?
I can only give you some pointers:
-dontwarn rules to addClassNotFoundException, MethodNotFoundException and FieldNotFoundException will tell you which -keep rules to addYou should be glad when your app crashes with ProGuard enabled — you’ll have somewhere to start your investigation :)
The worst class of problems to debug are when you app works, but for example doesn’t show a screen or doesn’t load data from the network.
That’s where you need to consider some of the scenarios I described in this article and get your hands dirty, even diving into the third party code and understanding why it might fail, such as when it uses reflection, introspection or JNI.
ProGuard will by default remove many code attributes and hidden metadata that are not required for program execution . Some of those are actually useful to the developer — for example, you might want to retain source file names and line numbers for stack traces to make debugging easier:
1 | -keepattributes SourceFile, LineNumberTable |
You should also remember to save the ProGuard mappings files produced when you build a release version and upload them to Play to get de-obfuscated stack traces from any crashes experienced by your users.
If you are going to attach a debugger to step through method code in a ProGuarded build of your app, you should also keep the following attributes to retain some debug information about local variables (you only need this line in your debug build type):
1 | -keepattributes LocalVariableTable, LocalVariableTypeTable |
The default build types are configured such that debug doesn’t run ProGuard. That makes sense, because we want to iterate and compile fast when developing, but still want the release build to use ProGuard to be as small and optimized as possible.
But in order to fully test and debug any ProGuard problems, it’s good to set up a separate, minified debug build like this:
1 | buildTypes { |
With this build type, you’ll be able to connect the debugger, run UI tests (also on a CI server) or monkey test your app for possible problems on a build that’s as close to your release build as possible.
Conclusion: When you use ProGuard you should always QA your release builds thoroughly, either by having end-to-end tests or manually going through all screens in your app to see if anything is missing or crashing.
ProGuard will by default remove all annotations and even some surplus type information from your code. For some libraries that’s not a problem — those that process annotations and generate code at compile time (such as Dagger 2 or Glide and many more) might not need these annotations later on when the program runs.
There is another class of tools that actually inspect annotations or look at type information of parameters and exceptions at runtime. Retrofit for example does this by intercepting your method calls by using a Proxy object, then looking at annotations and type information to decide what to put or read from the HTTP request.
Conclusion: Sometimes it’s required to retain type information and annotations that are read at runtime, as opposed to compile time. You can check out the attributes list in the ProGuard manual.
1 | -keepattributes *Annotation*, Signature, Exception |
If you’re using the default Android ProGuard configuration file (
*getDefaultProguardFile('proguard-android.txt')*), the first two options — Annotations and Signature — are specified for you. If you’re not using the default you have to make sure to add them yourself (it also doesn’t hurt to just duplicate them if you know they’re a requirement for your app).
The -repackageclasses option is not added by default in the ProGuard config. If you are already obfuscating your code and have fixed any problems with proper keep rules, you can add this option to further reduce DEX size. It works by moving all classes to the default (root) package, essentially freeing up the space taken up by strings like “com.example.myapp.somepackage”.
1 | -repackageclasses |
As I mentioned before, ProGuard can do 3 things for you:
The way I see it, everyone should try and configure their build to get 1. and 2. working.
To unlock 3. (additional optimizations), you have to use a different default ProGuard configuration file. Change the proguard-android.txt parameter to proguard-android-optimize.txt in your build.gradle:
1 | release { |
This will make your release build slower, but will potentially make your app run faster and reduce code size even further, thanks to optimizations such as method inlining, class merging and more aggressive code removal. Be prepared however, that it might introduce new and difficult to diagnose bugs, so use it with caution and if anything isn’t working, be sure to disable certain optimizations or disable the use of the optimizing config altogether.
In the case of Plaid, ProGuard optimizations interfered with how Retrofit uses Proxy objects without concrete implementations, and stripped away some method parameters that were actually required. I had to add this line to my config:
1 | -optimizations !method/removal/parameter |
You can find a list of possible optimizations and how to disable them in the ProGuard manual.
@Keep and -keep@Keep support is actually implemented as a bunch of -keep rules in the default Android ProGuard rules file, so they’re essentially equivalent. Specifying -keep rules is more flexible as it offers wildcards, you can also use different variants which do slightly different things (-keepnames, -keepclasseswithmembers and more).
Whenever a simple “keep this class” or “keep this method” rule is needed though, I actually prefer the simplicity of adding a@Keep annotation on the class or member, as it stays close to the code, almost like documentation.
If some other developer coming after me wants to refactor the code, they will know immediately that a class/member marked with @Keep requires special handling, without having to remember to consult the ProGuard configuration and risking breaking something. Also most code refactorings in the IDE should retain the @Keep annotation with the class automatically.
来源:
https://medium.com/androiddevelopers/practical-proguard-rules-examples-5640a3907dc9
Do you need to add default data to your database, right after it was created or when the database is opened? Use RoomDatabase#Callback! Call the addCallback method when building your RoomDatabase and override either onCreate or onOpen.
onCreate will be called when the database is created for the first time, after the tables have been created. onOpen is called when the database was opened. Since the DAOs can only be accessed once these methods return, we‘re creating a new thread where we’re getting a reference to the database, get the DAO, and then insert the data.
1 | Room.databaseBuilder(context.applicationContext, |
See a full example here.
Note: When using the ioThread approach, if your app crashes at the first launch, in between database creation and insert, the data will never be inserted.
Do you have multiple tables in your database and find yourself copying the same Insert, Update and Delete methods? DAOs support inheritance, so create aBaseDaoclass, and define your generic @Insert, @Update and @Delete methods there. Have each DAO extend the BaseDao and add methods specific to each of them.
1 | interface BaseDao<T> { |
See more details here.
The DAOs have to be interfaces or abstract classes because Room generates their implementation at compile time, including the methods from BaseDao.
Annotating a method with @Transaction makes sure that all database operations you’re executing in that method will be run inside one transaction. The transaction will fail when an exception is thrown in the method body.
1 |
|
You might want to use the @Transaction annotation for @Query methods that have a select statement, in the following cases:
@Relation fields. The fields are queries separately so running them in a single transaction will guarantee consistent results between queries.@Delete, @Update and @Insert methods that have multiple parameters are automatically run inside a transaction.
When you’re querying the database, do you use all the fields you return in your query? Take care of the amount of memory used by your app and load only the subset of fields you will end up using. This will also improve the speed of your queries by reducing the IO cost. Room will do the mapping between the columns and the object for you.
Consider this complex User object:
1 |
|
On some screens we don’t need to display all of this information. So instead, we can create a UserMinimal object that holds only the data needed.
1 | data class UserMinimal(val userId: String, |
In the DAO class, we define the query and select the right columns from the users table.
1 |
|
Even though Room doesn’t directly support relations, it allows you to define Foreign Key constraints between entities.
Room has the @ForeignKey annotation, part of the @Entity annotation, to allow using the SQLite foreign key features. It enforces constraints across tables that ensure the relationship is valid when you modify the database. On an entity, define the parent entity to reference, the columns in it and the columns in the current entity.
Consider a User and a Pet class. The Pet has an owner, which is a user id referenced as foreign key.
1 |
|
Optionally, you can define what action to be taken when the parent entity is deleted or updated in the database. You can choose one of the following: NO_ACTION, RESTRICT, SET_NULL, SET_DEFAULT or CASCADE, that have same behaviors as in SQLite.
Note: In Room, SET_DEFAULT works as SET_NULL, as Room does not yet allow setting default values for columns.
@RelationIn the previousUser-Pet example, we can say that we have a one-to-many relation: a user can have multiple pets. Let’s say that we want to get a list of users with their pets: List.
1 | data class UserAndAllPets (val user: User, |
To do this manually, we would need to implement 2 queries: one to get the list of all users and another one to get the list of pets based on a user id.
1 |
|
We would then iterate through the list of users and query the Pets table.
To make this simpler, Room’s @Relation annotation automatically fetches related entities. @Relation can only be applied to a List or Set of objects. The UserAndAllPets class has to be updated:
1 | class UserAndAllPets { |
In the DAO, we define a single query and Room will query both the Users and the Pets tables and handle the object mapping.
1 |
|
Let’s say that you want to get a user based on the user id in an observable query:
1 |
|
You’ll get a new emission of the User object whenever that user updates. But you will also get the same object when other changes (deletes, updates or inserts) occur on the Users table that have nothing to do with the User you’re interested in, resulting in false positive notifications. Even more, if your query involves multiple tables, you’ll get a new emission whenever something changed in any of them.
Here’s what’s going on behind the scenes:
DELETE, UPDATE or INSERT happens in a table.InvalidationTracker that uses Observers that track whenever something has changed in the observed tables.LiveData and Flowable queries rely on the InvalidationTracker.Observer#onInvalidated notification. When this is received, it triggers a re-query.Room only knows that the table has been modified but doesn’t know why and what has changed. Therefore, after the re-query, the result of the query is emitted by the LiveData or Flowable. Since Room doesn’t hold any data in memory and can’t assume that objects have equals(), it can’t tell whether this is the same data or not.
You need to make sure that your DAO filters emissions and only reacts to distinct objects.
If the observable query is implemented using Flowables, use Flowable#distinctUntilChanged.
1 |
|
If your query returns a LiveData, you can use a MediatorLiveData that only allows distinct object emissions from a source.
1 | fun <T> LiveData<T>.getDistinct(): LiveData<T> { |
In your DAOs, make method that returns the distinct LiveData public and the method that queries the database protected.
1 |
|
See more of the code here.
Note: if you’re returning a list to be displayed, consider using the Paging Library and returning a LivePagedListBuilder since the library will help with automatically computing the diff between list items and updating your UI.
来源:
https://medium.com/androiddevelopers/7-pro-tips-for-room-fbadea4bfbd1
翻译:
https://baijiahao.baidu.com/s?id=1626702427361302777&wfr=spider&for=pc
LiveData可以通过Transformations的map和switchMap操作,将一个LiveData转成另一种类型的LiveData,效果与RxJava的map/switchMap操作符类似。
可以看看两个函数的声明
1 | public static <X, Y> LiveData<Y> map( |
根据以上代码,我们可以知道,对应的变换函数返回的类型是不一样的:map是基于泛型类型的变换,而switchMap则返回一个新的LiveData。
来源:
设置alpha有一种局限性,会使得内容也变得透明,但是使用透明色只会使背景透明,内容不透明
不透明
100%FF
95%F2
90%E6
85%D9
80%CC
75%BF
70%B3
65%A6
60%99
55%8C
半透明50%80
45%73
40%66
35%59
30%4D
25%40
20%33
15%26
10%1A
5%0D
全透明
0%00
举例:
全透明:#00000000
半透明:#80000000
不透明:#FF000000
白色半透明:#80FFFFFF
红色30%透明:#4Dca0d0d
来源:
每一个标准的 HTML 文档都包含一个 <head> 头部分,除了声明文档类型,编码方式和文档标题,引入外部资源这些基本功能外,
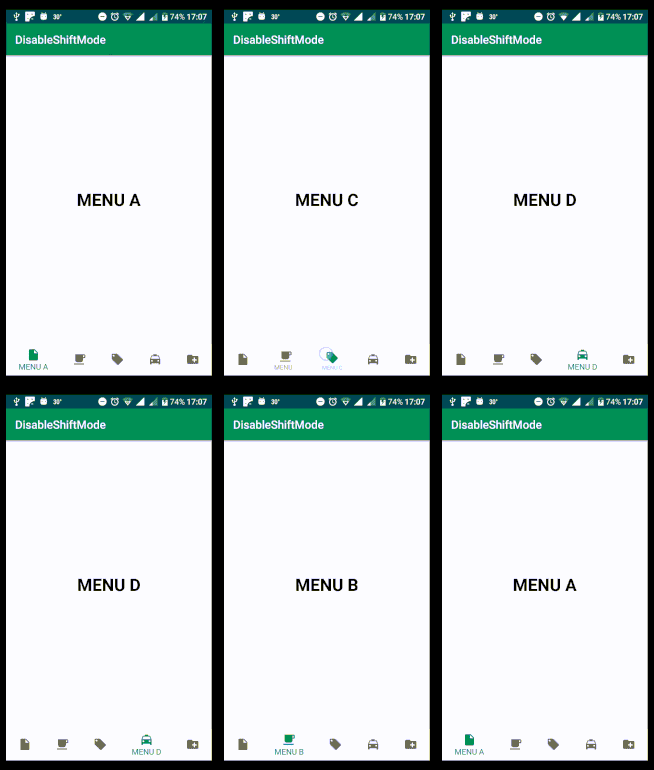
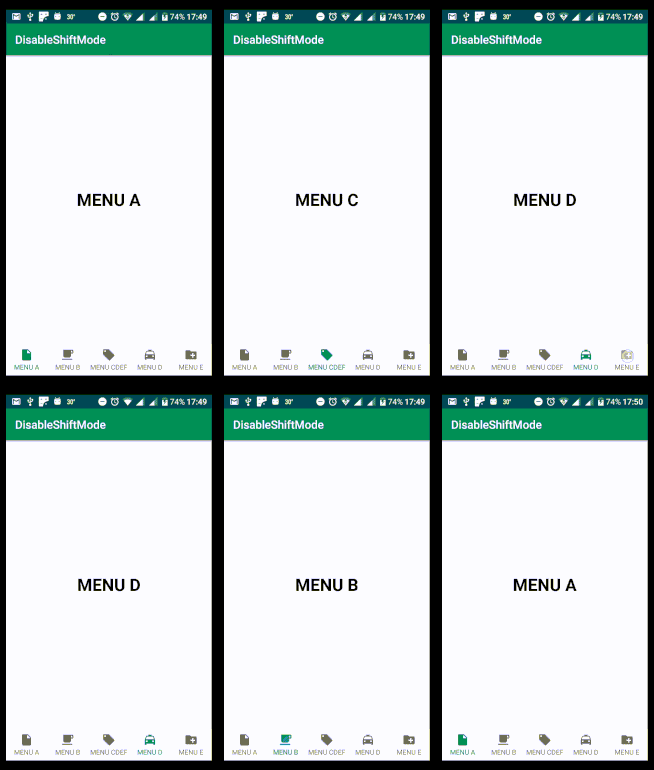
The above transition we can remove by adding this
1 | <com.google.android.material.bottomnavigation.BottomNavigationView |
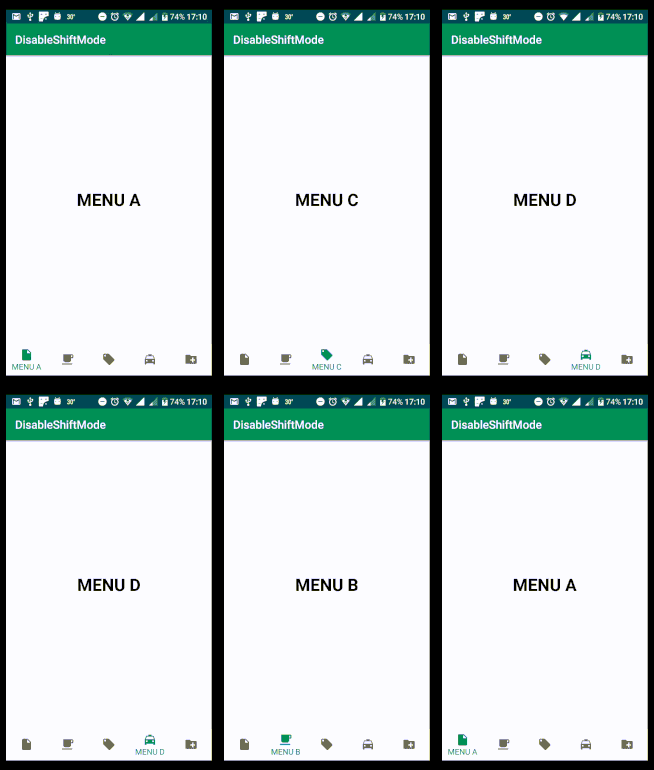
Now, we can also show label and remove the translation together without app:itemHorizontalTranslationEnabled="false" this way
1 | <com.google.android.material.bottomnavigation.BottomNavigationView |
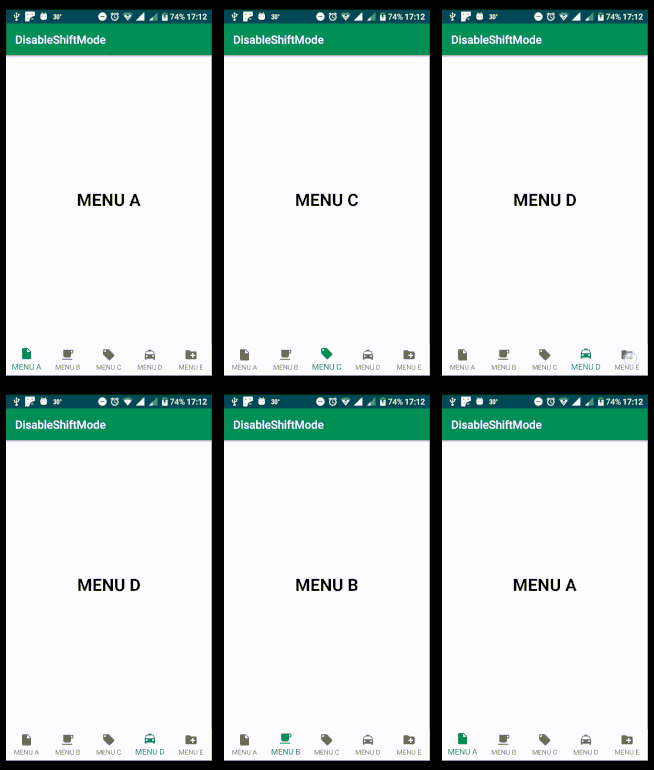
If we want the same size of bottom navigation text then we can use the value of dimen.xml just add this line.
1 |
|
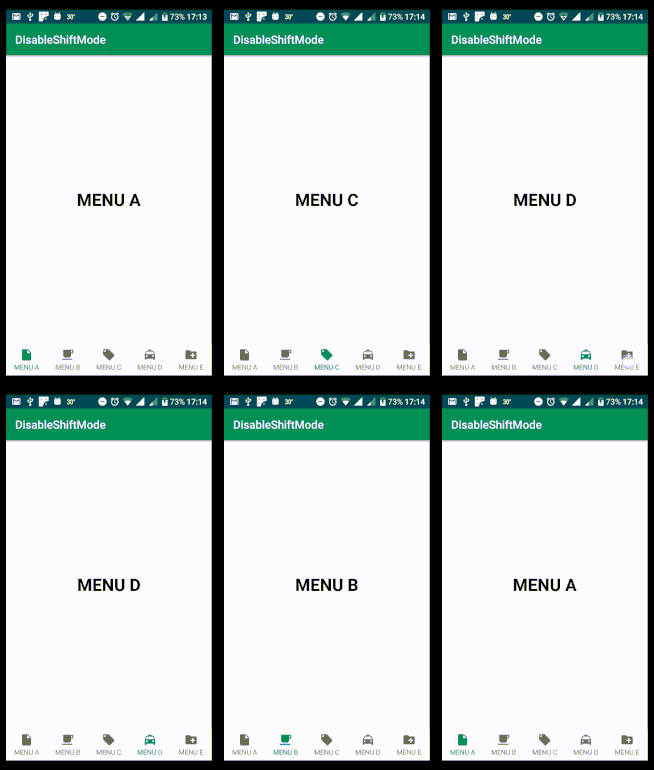
The one problem is still here, What if the menu text is a long text? What if it was made of 2 words?
you will see the long text trimmed when the menu is selected. (Please look at the third menu)
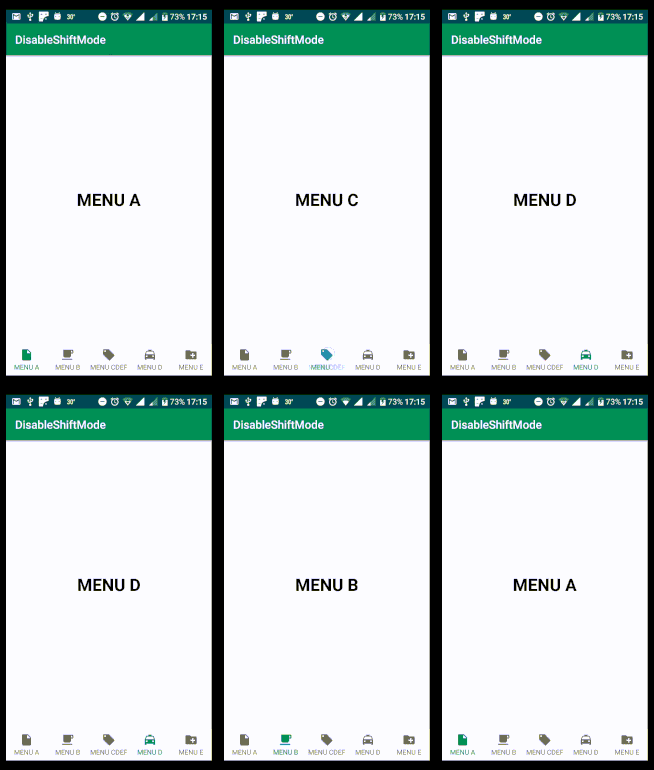
You just need to hide the long text and show the small text by doing like this below snippet of code.
1 | TextView largeTextView = bottomNavigationView.findViewById(itemID) .findViewById(com.google.android.material.R.id.largeLabel); TextView smallTextView = bottomNavigationView.findViewById(itemID) .findViewById(com.google.android.material.R.id.smallLabel); smallTextView.setVisibility(View.VISIBLE); largeTextView.setVisibility(View.GONE); |
