GitHub Actions for Android developers
If you are developing Android apps, chances are you have confronted any sort of CI at some point in your career. If you thought Android fragmentation was a thing, the wide availability of CI systems will be familiar to you.
GitHub Actions was released around November 2019, and since then it has proved itself to be reliable for a production environment (one of our requirements before committing to any software system). Like many other CI/CD systems, GitHub actions ultimately let us define a workflow for our apps to automatically build, test and deploy them.
One of the shiniest aspects of GitHub Actions is its integration with GitHub. For repositories that are already hosted in GitHub, GitHub Actions allows us to automate the process in one single platform, without having to rely upon any external tools. Your code is on GitHub, your CI/CD runs on GitHub, and you can have also your distribution on GitHub if you wish.
Now, GitHub Actions provides thoughtful guides and documentation, although jumping initially onto it might be overwhelming for folks without previous experience with it. The documentation provides an example of a basic set-up for Android developers, but you might be wondering “where can I get some inspiration on things I can do with GitHub Actions?”. This post aims to provide a few answers based on my personal experience using GitHub Actions. I have been using it for an Android project, and hence my experience (and this post) is limited to this platform. Without any further delay, let’s go.
The structure of our config file
GitHub Actions requires a .yml file specifying all the steps for the CI/CD. YAML files are uncomfortable, especially when they become large (indentation problems might become unnoticed, and support from IDEs is rare). The files are stored in the folder .github/workflows/file.yml. A minimal example of how they look is the following:
1 | # Workflow name |
Actions
Actions are a particular type of step that help us with the task of automating our CI/CD. Anybody can publish their Action as open-source, and they are browsable via GitHub. Many of the functionality we might want to implement is likely already here, so it is worth taking a look to avoid reinventing the wheel. And of course, it is possible to fork and modify existing actions or create our own ones.
Now, here is a list of some suggestions of operations we can perform in Android. As the name CI/CD, we typically want to start building and deploying apps, but there are some goodies that we can apply (notify certain channels or platforms, etc). Let’s get started.
Setting up our Android app
Initially, we will set up our environment, and in order to do that, we need to check out our project and set up our JDK. We will be using our first Action here, Checkout v2 to do a git checkout of our repository, and setup-java to prepare our Java environment.
1 | ## Checkout our repository ### |
Building our artifacts
The foundation of every project is to compile all our artifacts to be uploaded and/or distributed. Android has often a particularity, and is that we might generate several APKs based on our Flavor or BuildTypes. Some of them are relevant (our release artifact that might go directly to our test team), some of them less relevant (our test artifacts that are just for development use) depending on your team structure. Luckily, we can call directly Gradle commands and generate the number of artifacts that are relevant. We will use the Action gradle-command-action to execute our Gradle command. An example can be the following:
1 | ## Build all our Build Types at once ## |
The line arguments: assembleRelease is the relevant one here. We can easily substitute it with the Gradle command we want to execute.
Testing
There are several tests or analysis tool we might want to run on our CI/CD environment. Luckily, with GitHub actions we can directly run our Gradle commands. Starting for instance our tests or Lint can be done easily by directly calling the relevant Gradle command:
1 | - name: Run Kotlin Linter |
We can also run our Espresso Tests on GitHub Actions. There are several actions that allow us to trigger them, we will showcase android-emulator-runner by Reactive Circus:
1 | uses: reactivecircus/android-emulator-runner@v2 |
Signing artifacts
Signing artifacts is the next natural step while creating our Android artifact, so they can be installed on a device.
1 | ## Sign our artifact## |
Some further explanation of what is going on here:
The task named “Sign artifact” uses the sign-android-release Action. This is pretty straight-forward: we need to specify the information related to the key, so the APK gets signed. It is possible to specify different tasks if we need them (for instance, because we need to sign APKs with different keys).
The task “Upload our APK” uploads artifacts from our workflow, allowing us to share data between jobs and store data once a workflow is complete. It uses the Action upload-artifact. Note that on the path field we are using a wildcard app-artifact-*.apk.
With Gradle we can customize our configuration file to determine the name of our resulting APK. This results in a much more readable output, rather than always using the default APK name. For instance, the following code block changes the name of our Gradle file to a more readable format (app-{flavor}-{buildName}-{versionName}.apk:
1 | android.applicationVariants.all { variant -> |
Create Release
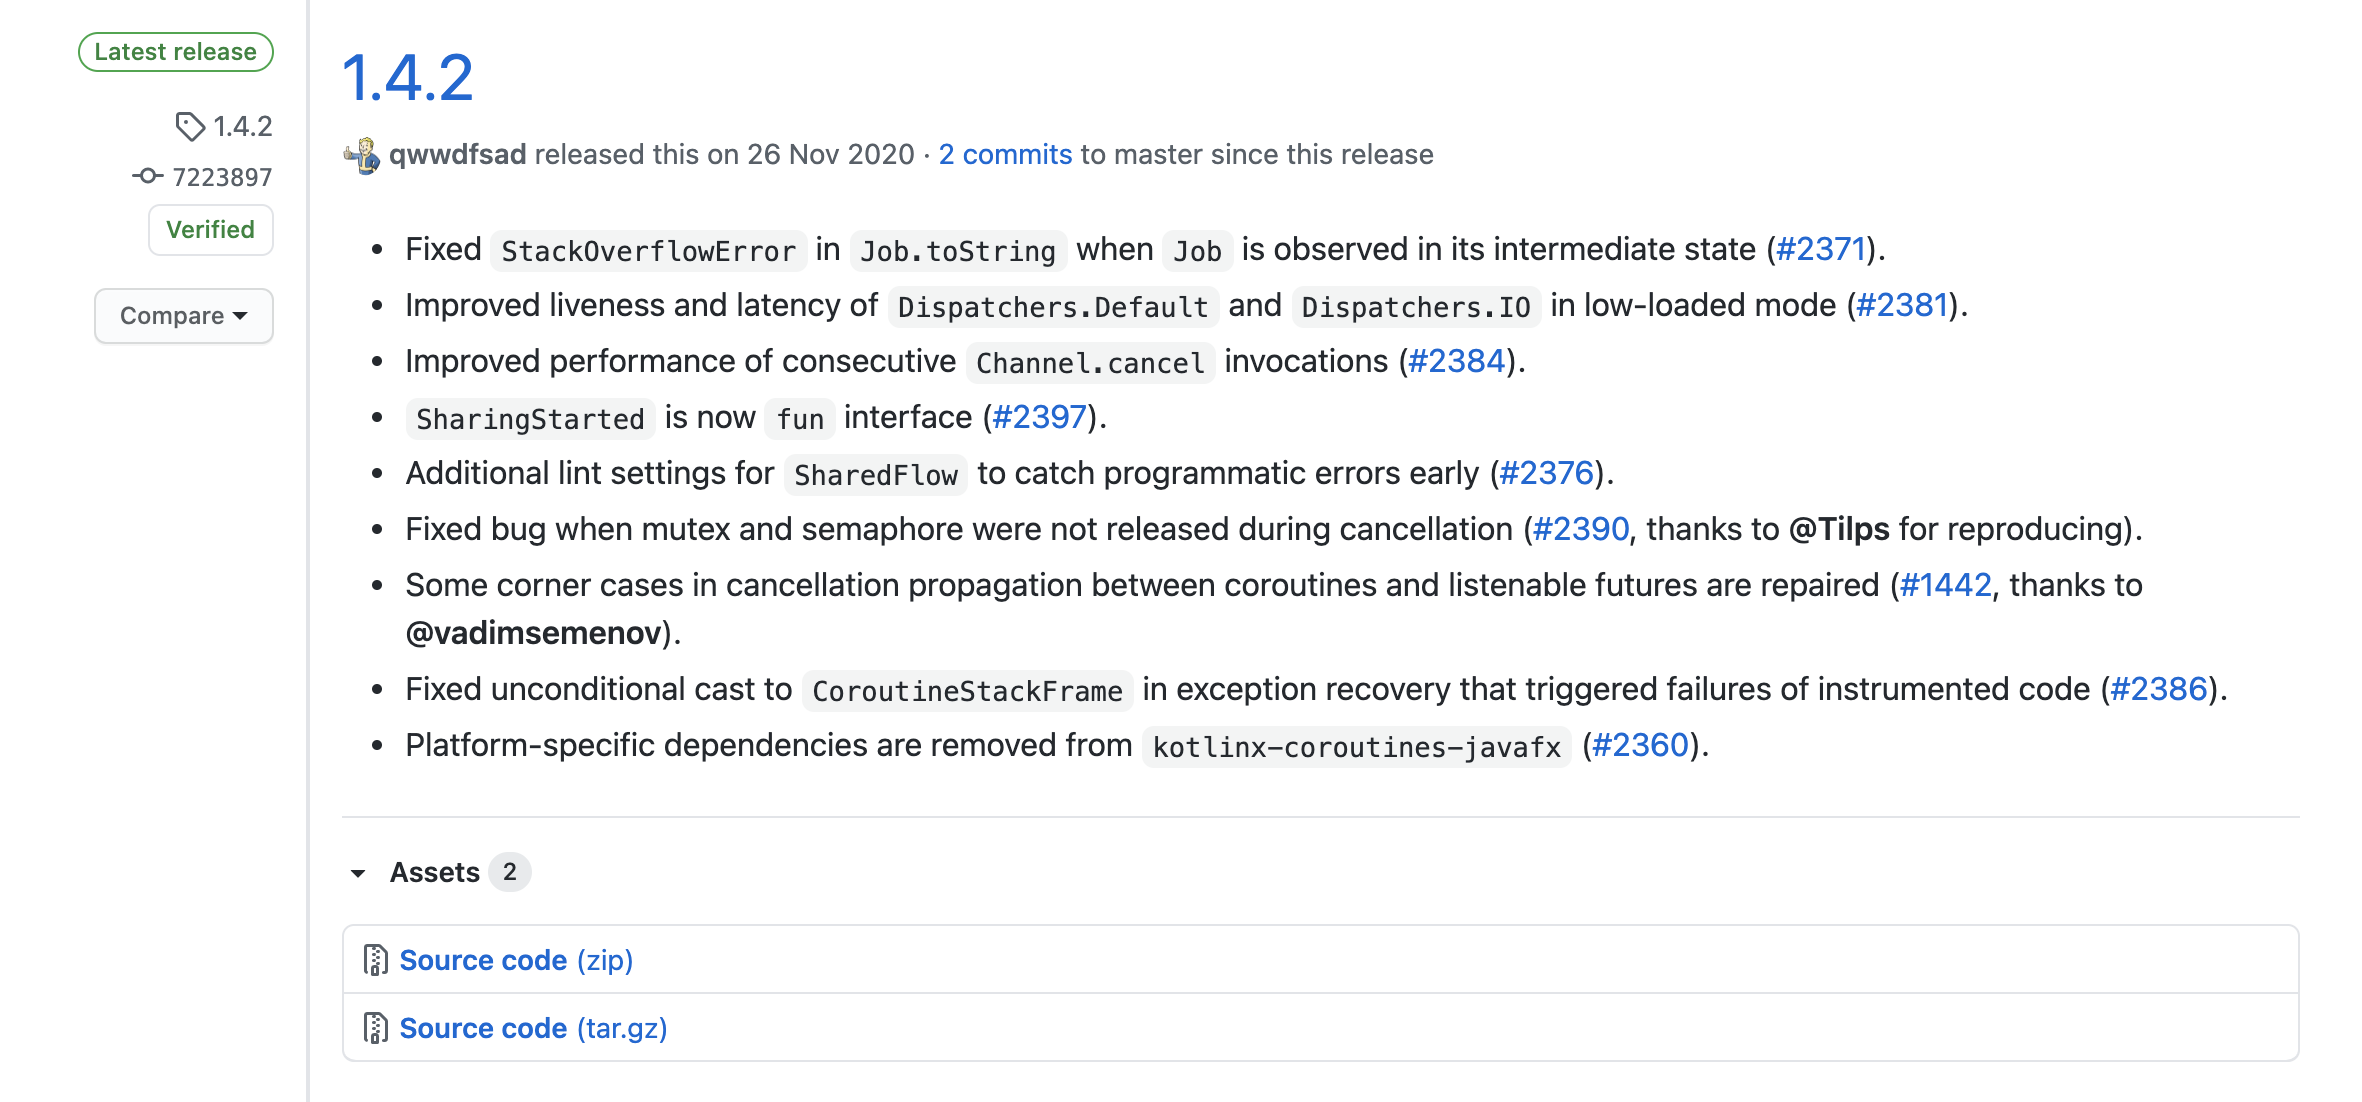
Something interesting offered in GitHub is the possibility to create a Release in GitHub itself, which we can later use to distribute our artifacts. For instance, see how the Release page for the version 1.4.2 of the Kotlin coroutines looks like:

Each of those releases can contain a number of artifacts, source code, documentation, etc. It is also possible to publish some CHANGELOG or notes for a particular release (more on creating this automatically later). It is certainly useful to have this automatically created with the entire process. This is the relevant section that will create the release in GitHub.
1 | - name: Create Release |
Upload our assets to GitHub
With the release being created, it is time to upload our own assets. We are going to use an auxiliary task in order to gather our APK names and paths (supposing we are having custom names for them, as explored before).
1 | - name: Save name of our Artifact |
Note a couple of relevant points in this code block:
- We are setting the name of our PATH and the artifact in environment variables, which are later on saved on GitHub. This is a fantastic way to store information in GitHub Actions.
- We are running a command to determine the name of the APK (
ls app/build/outputs/apk/ourbuildtype/release/*.apk | head -n 1). This is highly versatile, since we can essentially use Unix/Mac commands to determine a variety of things (and later on, store them on our PATH and reuse them in other steps).
With the names and PATHs already stored on an environment variable, we will now proceed to upload them to our release page. This uses the action upload-release-asset:
1 | - name: Upload our Artifact Assets |
This has created our artifacts on GitHub, and we are ready to distribute them. There are a bunch of notification mechanisms we can use. For instance, if we have a Slack group we could notify a particular channel that our release is ready, using act10ns/slack:
1 | - name: Notify on Slack |
There is a good number of options already available as GitHub actions, including notifications on Telegram, via E-Mail or Discord. If you can think of a particular platform you need, there is likely a GitHub action that covers it.
We could give it a last touch, and this would be to automatically fill the CHANGELOG taking some information that is already available. As you can imagine, there is already a GitHub action that solves this. This one takes the information from a CHANGELOG.md file according to keepchangelog.com, but it would not be hard to do it using git log –pretty=oneline, or a similar format.
Summary
GitHub Actions is one more CI/CD engine in the market. If you are using GitHub already, it provides a very decent integration with your code, issues and release workflow. It is highly customizable, providing APIs to create your own actions as you need them, or accessing them from the GitHub marketplace. As with any cloud based solution (or any tech solution, for what it matters), there are several factors to weigh in before deciding on whether it makes sense to adopt it, or not. I believe it is a comfortable solution that works out a wide range of requirements.
来源:
https://medium.com/google-developer-experts/github-actions-for-android-developers-6b54c8a32f55
Android Activity
Activity | Android 开发者 | Android Developers (google.cn)
ContextAware :
https://juejin.cn/post/6930965257091285005
Activity Result Contract:
https://juejin.cn/post/6900102308604936205
Activity Result Contract – The Basics
Activity Result Contract – Outside The Activity – Styling Android
使用 Jetpack ActivityResult 处理 Activity 之间的数据通信

Android UI
Material UI
NestedScrollView
CoordinatorLayout
[用 CoordinatorLayout 处理滚动](用 CoordinatorLayout 处理滚动 (juejin.cn))
CollapsingToolbarLayout
AppBarLayout
Bottom Sheet
TabLoyout
TextInputLayout & TextInputEditText
TextInputLayout TextInputEditText - 简书 (jianshu.com)
Android TextInputLayout Example - JournalDev
Android Material Text Fields - JournalDev
Material Button
Toolbar
FloatingActionBar
SnackBar
BottomAppBar
Navigation
BottomNavigationView
DrawerLayout
CardView
Chips & ChipGroup & ChipDrawable
SpannableStringBuilder
Elasticearch 基础

基本概念:
· Cluster「集群」:由部署在多个机器的ES节点组成,以处理较大数据集和实现高可用;* Node「节点」:机器上的ES进程,可配置不同类型的节点;
· Master Node「主节点」:用于集群选主。由其中一个节点担任主节点,负责集群元数据管理,如索引创建,节点离开加入集群等;
· Data Node「数据节点」:负责索引数据存储;
· Index「索引」:索引数据的逻辑集合,可类比关系型数据的DataBase;
· Shard「分片」:索引数据子集,通过将分片分配至集群不同节点,实现数据横向扩展。以解决单个节点CPU、内存、磁盘处理能力不足的情况;
· Primary Shard「主分片」:数据分片采用主从模式,由分片接收索引操作;
· Replica Shard「副本分片」:主分片的拷贝,以提高查询吞吐量和实现数据高可靠。主分片异常时,其中一个副本分片会自动提升为新的主分片。
Snowflake
ID生成器在前后端系统内都比较常见,应用场景广泛,如:订单ID、账户ID 、流水号、消息ID等等。常见的ID类型如下:
• UUID和GUID:GUID和UUID本质类似,GUID来源于微软。一个UUID是一个16字节 (128 bit) 的数字。UUID由网卡MAC地址、时间戳、名字空间 ( Namespace )、随机或伪随机数、时序等元素进行生成。优点:在特定范围内可以保证全局唯一;生成方便,单机管理即可。缺点:所占空间比较大;无序,在插入数据库时可能会引起大规模数据位置变动,性能不友好。
• 数据库自增ID:主要基于关系数据库如MySQL的autoincrement自增键,在业务量不是很大时使用比较方便。基于数据库自增字段也有一些变种,如下面会介绍到的号段模式。优点:实现成本低,直接基于DB实现,不需要引入额外组件;能够实现单调自增,递增场景友好。缺点:需要考虑高可用、横向扩展问题。
• snowflake :雪花算法由毫秒时间戳(41位) + 机器ID(workerId 10位) + 自增序列 (12位),理论上最多支持1024台机器每秒生产400w个ID。雪花算法综合考虑了性能、全局唯一、趋势自增、可用性等,是一种非常理想的ID生成算法。
snowflake是Twitter于2010年首次对外公开,其值为64位整数,可以做到全局唯一。构造如下:

wsl & vscode 搭建 php 开发环境
WSL 安装参考:
以管理员身份打开 Windows PowerShell:
1 | wsl --install |
过了有一段时间,但是进度条不增长,重启电脑😂。(不清楚是不是我同时在安装其他软件的缘故?)
打开 Windows PowerShell, 运行如下命令:
1 | wsl --list --online |
列出所有可用的 Linux 分发版本。
然后打开 MicroSoft Store, 搜索自己想要的下载的版本,下载完成后,点击打开,设置账号密码即可。
同时可以在 MicroSoft Store 搜索安装 Windows Terminal, PowerShell。外观界面会好看许多, 在 Windows Terminal 中可以方便的打开安装的 Linux 系统。
设置 WSL 开发环境
https://docs.microsoft.com/en-us/windows/wsl/tutorials/wsl-vscode
PHP
1 | composer global require friendsofphp/php-cs-fixer |
1 | ln -s /home/{用户名}/.composer/vendor/bin/php-cs-fixer /usr/bin |
MySQL
1 | sudo mysql |
1 | create user 'bao'@'%' identified by 'Bao2020'; |
参考:
https://docs.microsoft.com/zh-cn/windows/wsl/tutorials/wsl-database
https://www.cnblogs.com/keme/p/10288168.html
Nodejs
1 | curl -sL https://deb.nodesource.com/setup_16.x | sudo -E bash - |
1 | sudo apt-get install -y nodejs |
1 | //查看版本号 |
可能遇到的问题:
1、dpkg: error processing archive /var/cache/apt/archives/nodejs_16.17.0-deb-1nodesource1_amd64.deb:
1 | dpkg: error processing archive /var/cache/apt/archives/nodejs_16.17.0-deb-1nodesource1_amd64.deb (--unpack): |
解决办法:
1 | sudo dpkg -i --force-overwrite /var/cache/apt/archives/nodejs_16.17.0-deb-1nodesource1_amd64.deb |
停止 WSL:
1 | wsl --shutdown |
Powerline
文档: https://docs.microsoft.com/zh-cn/windows/terminal/tutorials/powerline-setup
https://ohmyposh.dev/docs/installation
1 | Import-Module : 无法加载文件 C:\Users\hefengbao\Documents\WindowsPowerShell\Modules\posh-git\0.7.3\posh-git.psm1,因为在此系统上禁止运行脚本。有关详细信息,请参阅 https:/go.microsoft.com/fwlink/?LinkI |
以管理员身份运行 powershell:
1 | Set-ExecutionPolicy -ExecutionPolicy RemoteSigned |
1 | package golang.org/x/crypto/ssh/terminal: unrecognized import path "golang.org/x/crypto/ssh/terminal" (https fetch: Get https://golang.org/x/crypto/ssh/terminal?go-get=1: dial tcp 216.239.37.1:443: i/o timeout) |
添加代理, 参考 https://goproxy.io/zh/:
1 | sudo go env -w GO111MODULE=on |
Ubuntu 安装字体 https://www.cnblogs.com/picaso/p/3356292.html
https://blog.csdn.net/cunfuteng7334/article/details/109050492
VS Code:
Terminal 字体:
添加 Cascadia Code PL
可能遇到的问题:
1、我在安装 php7.4-fpm 时出现:
1 | invoke-rc.d: could not determine current runlevel |
参考 https://github.com/microsoft/WSL/issues/1761
1 | sudo su |
Ubuntu 安装 composer
1 | sudo apt update |
1 | wget -O composer-setup.php https://getcomposer.org/installer |
1 | sudo php composer-setup.php --install-dir=/usr/local/bin --filename=composer |
如何在 Ubuntu 20.04 上安装和使用 Composer - 知乎 (zhihu.com)
参考: