WAMPServer 之 Apache 日志分割

WAMPServer 服务器访问出错,想看看访问日志,但是累积的日志文件过大(1.4G),文本编辑器没法打开,便打算做日志分割,在网上找到了办法,并能正确设置,现在记录一下:

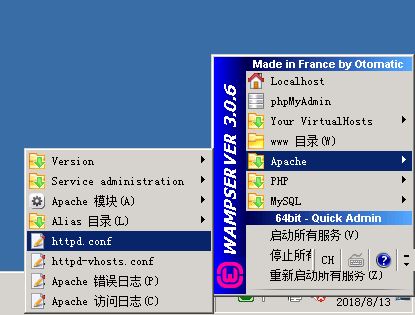
httpd.conf

打开 httpd.conf 文件,查找 ErrorLog ,作如下修改:

1
ErrorLog "|${INSTALL_DIR}/bin/apache/apache2.4.23/bin/rotatelogs.exe ${INSTALL_DIR}/logs/error-%y%m%d.log 86400 480"

查找 CustomLog 作如下修改:

1
CustomLog "|${INSTALL_DIR}/bin/apache/apache2.4.23/bin/rotatelogs.exe ${INSTALL_DIR}/logs/access-%y%m%d.log 86400 480" common

重启所有服务。

参考:
window apache 日誌分割

Ubuntu redis 多实例安装

Ubuntu 16.04
Redis 4.0.6

安装 redis:

1
apt-get install redis-server

安装成功后,默认端口为 6379.

接下来完成一个端口为 6380 的服务端:

修改 redis 配置文件:

1
2
3
4
5
cd /etc/redis

cp redis.conf redis-6380.conf

vi redis-6380.conf

作如下修改:

1
2
3
4
5
6
7
8
port 6380

pidfile /var/run/redis/redis-server-6380.pid

logfile /var/log/redis/redis-server-6380.log

dbfilename dump-6380.rdb

修改 redis 启动文件:

1
2
3
4
5
cd /etc/init.d/

cp redis-server redis-server-6380

vi redis-server-6380

作如下修改:

1
2
3
4
5
6
DAEMON_ARGS=/etc/redis/redis-6380.conf

DESC=redis-server-6380

PIDFILE=$RUNDIR/redis-server-6380.pid

添加 service:

1
2
3
cp /lib/systemd/system/redis-server.service /lib/systemd/system/redis-server-6380.service

vi /lib/systemd/system/redis-server-6380.service

作如下修改:

1
2
3
ExecStart=/usr/bin/redis-server /etc/redis/redis-6380.conf

PIDFile=/var/run/redis/redis-server-6380.pid
1
2
cd /etc/systemd/system
ln -s /lib/systemd/system/redis-server-6380.service redis-6380.service

启动 redis-server-6380:

1
2
3
service redis-server-6380 start 

ps -ef | grep redis
1
2
redis     5885     1  0 Jul20 ?        00:00:40 /usr/bin/redis-server 127.0.0.1:6379
redis 9339 1 0 09:20 ? 00:00:00 /usr/bin/redis-server 127.0.0.1:6380

已删除的包 在运行 package:discover 命令时出现 Class not found 错误?

spatie/laravel-permission 替换 zizaco/entrust 做权限管理,把代码同步到服务器,我通过 composer install 命令移除了 zizaco/entrust ,然后运行到最后出现如下错误:

1
2
3
4
5
6
> Illuminate\Foundation\ComposerScripts::postAutoloadDump
> php artisan package:discover

In ProviderRepository.php line 208:

Class 'Zizaco\Entrust\EntrustServiceProvider' not found

原因:
我之前运行了 php artisan config:cache 命令做优化,缓存导致的~

解决:

1
2
3
php artisan config:clear

composer install

Laravel 用 UUID 做主键

Laravel version 5.6.*

Laravel 项目用 UUID 做主键, 可以用 Str::uuidStr::orderedUuid 方法生成,但是当前版本直接使用 Str::orderedUuid 方法会报错,需要安装 moontoast/math 扩展包:

1
composer require moontoast/math

我遇到的另一个问题是,查询数据时, 结果中 ID (主键) 会自动转化为整数,发生的原因:

1
2
3
4
5
6
7
8
9
10
11
12
13
14
15
16
17
<?php

namespace Illuminate\Database\Eloquent;

abstract class Model implements ArrayAccess, Arrayable, Jsonable, JsonSerializable, QueueableEntity, UrlRoutable{

...

/**
* The "type" of the auto-incrementing ID.
*
* @var string
*/
protected $keyType = 'int';

...
}

由于主键默认设置为 int 类型,所以会自动转换。

解决办法,在我们的 模型 文件中,重写该属性:

1
protected $keyType = 'string';

Android获取签名证书的sha1值

开发环境: Windows 10

一般用 keytool 命令获取。

打开 PowerShell:

1
cd  .android

输入如下命令,回车:

1
keytool

如果没有错误,万事大吉;如果出现 keytool 不是内部或外部命令,也不是可运行的程序或批处理文件, 则说明 java 环境没有配置好:

1、安装 JDK

2、新建系统变量 JAVA_HOME, CLASSPATH, 如下所示(注意自己 JDK 安装目录)
JAVA_HOME D:\Java\jdk
CLASSPATH %JAVA_HOME%\lib\dt.jar;%JAVA_HOME%\lib\tools.jar

3、然后在 path 中分别添加:
%JAVA_HOMW%\bin
%JAVA_HOME%\jre\bin

生成 sha1:

网上教程一般都用如下命令:

1
keytool -list -keystore debug.keystore

秘钥: android

会正确生成 sha1 ,但也会有如下提示:

1
2
Warning:
JKS 密钥库使用专用格式。建议使用 "keytool -importkeystore -srckeystore debug.keystore -destkeystore debug.keystore -deststoretype pkcs12" 迁移到行业标准格式 PKCS12。

按提示修改。

RecyclerView 滚动监听

偶然在在网上看到的,先抄下来~

1
2
3
4
5
6
7
recyclerView = (RecyclerView) findViewById(R.id.recyclerView);
manager = new LinearLayoutManager(this);
adapter = new RecyclerAdapter();
//设置布局管理器
recyclerView.setLayoutManager(manager);
//给recyclerview设置适配器
recyclerView.setAdapter(adapter);

如果是想每个item横向滑动的话,只需要使用LinearLayoutManager的三个参数的构造方法就行了,new LInearLayoutManager(this, LinearLayoutManager.HORIZONTAL, true)就可以实现横向滑动的效果了。

给RecyclerView添加滚动监听。与listView和gridView有写不同,recyclerView判断滚动到哪一个位置的时候,需要使用到使用到布局管理器(前面设置的recyclerview.setLayoutManager())。

1
2
3
4
5
6
7
8
9
10
11
12
13
14
15
16
17
18
19
20
21
recyclerView_follow.addOnScrollListener(new RecyclerView.OnScrollListener() {
@Override
public void onScrollStateChanged(RecyclerView recyclerView, int newState) {
super.onScrollStateChanged(recyclerView, newState);
//滚动的状态改变时,调用此方法。
}

@Override
public void onScrolled(RecyclerView recyclerView, int dx, int dy) {
super.onScrolled(recyclerView, dx, dy);
//屏幕中最下面一个item的所在数据源的位置(postion)。
int lastVisiableItem = manager.findLastVisibleItemPosition();
//一共有多少个
int totalItemCount = manager.getItemCount();
//当滑动到倒数第二个item时,即联网获取下一页的数据
if (lastVisiableItem >= totalItemCount - 2 && dy > 0) {
page++;//第二页
reloadData(page);
}
}
});

Ubuntu 安装 gitlab

这里选用的是社区版(ce)

参考官方资料:https://about.gitlab.com/installation/#ubuntu?version=ce

1、安装和配置需要的依赖

1
2
sudo apt-get update
sudo apt-get install -y curl openssh-server ca-certificates
1
sudo apt-get install -y postfix

2、添加 GitLab 包并安装

1
curl https://packages.gitlab.com/install/repositories/gitlab/gitlab-ce/script.deb.sh | sudo bash

如果下载太慢,参考 https://blog.csdn.net/qingchunweiliang/article/details/53869601 改用国内镜像。

1
sudo EXTERNAL_URL="http://gitlab.example.com" apt-get install gitlab-ce

EXTERNAL_URL 是访问地址(域名或 ip),可以在这里填写,也可以在安装成功后修改:

1
sudo apt-get install gitlab-ce
1
sudo vi /etc/gitlab/gitlab.rb

修改 external_url, 比如修改为 192.168.1.10:10000, 这里添加了端口,也要修改 gitlab 自带的 Nginx 服务器监听的端口:

1
2
3
sudo su
cd /var/opt/gitlab/nginx/conf/
vi gitlab-http.conf

修改:

1
listen *:10000
1
2
gitlab-ctl reconfigure
gitlab-ctl restart

在浏览器访问 http://192.168.1.10:10000, 会跳转到修改修改 root 密码界面,修改密码,然后用 root 帐号登录。

手动修改 root 密码:

参考 https://blog.csdn.net/yin138/article/details/51394868

1
gitlab-rails console production
1
2
3
4
5
6
7
8
9
10
11
user = User.where(id: 1).first

user.password=12345678

user.password_confirmation=12345678

user.email='admin@example.com'

user.save!

quit

密码长度最少为 8 为,如果含有字符,需要用引号引起来。至于密码中含有字符,用引号包含,引号算不算密码的一部分,没尝试!

https://blog.csdn.net/dhweicheng/article/details/99712957

卸载:

Complete uninstall gitlab-ce from ubuntu 14 - GitLab CI/CD - GitLab Forum

gitlab-ctl reconfigure卡在 ruby_block[wait for redis service socket] action run :

https://blog.csdn.net/OldDirverHelpMe/article/details/106536972

修改数据存储目录:

https://docs.gitlab.com/omnibus/settings/configuration.html#storing-git-data-in-an-alternative-directory

/var/opt/gitlab/prometheus ,占用的空间非常大

Gitlab磁盘空间问题 针对Prometheus

Ubuntu 安装Oracle Instant Client 和 OCI

高版本需要安装 glibc 2.14 及以上版本

glibc的安装配置_glibc环境变量

ZIP 文件安装

在官网 http://www.oracle.com/technetwork/topics/linuxx86-64soft-092277.html 下载:Instant Client Package - Basic 和 Instant Client Package - SDK ,我选的版本是Version 21.1.0.0.0,下载 zip 格式的, 由于需要登录,所以最好在桌面电脑下载好,然后上传到 Ubuntu 服务器。我上传到 /opt/oracle 目录,在下载页面的底端,有安装的文档,我也把我安装的过程写出来:

1、解压:

使用 unzip 命令,可通过 sudo apt-get install unzip 安装。

1
2
unzip instantclient-basic-linux.x64-21.1.0.0.0.zip
unzip instantclient-sdk-linux.x64-12.2.0.1.0.zip

解压到的目录是 /opt/oracle

2、创建适合的软连接

libclntsh.solibocci.so 这两文件已经有了,但是发现会报错,删除后,建立软连接:

1
2
3
cd /instantclient_21_1
ln -s libclntsh.so.21.1 libclntsh.so
ln -s libocci.so.21.1 libocci.so

3、安装 oci8

一点准备:

1
2
3
apt-get install make  //为了后面的编译软件使用
apt-get install php-pear //为了得到 pecl 这个程序
apt-get install php7.4-dev //为了得到 phpize 这个程序

运行 sudo pecl install oci8-2.2.0 命令,

出现如上界面,按提示输入:

1
instantclient,/opt/oracle/

回车,不出意外,会安装成功。

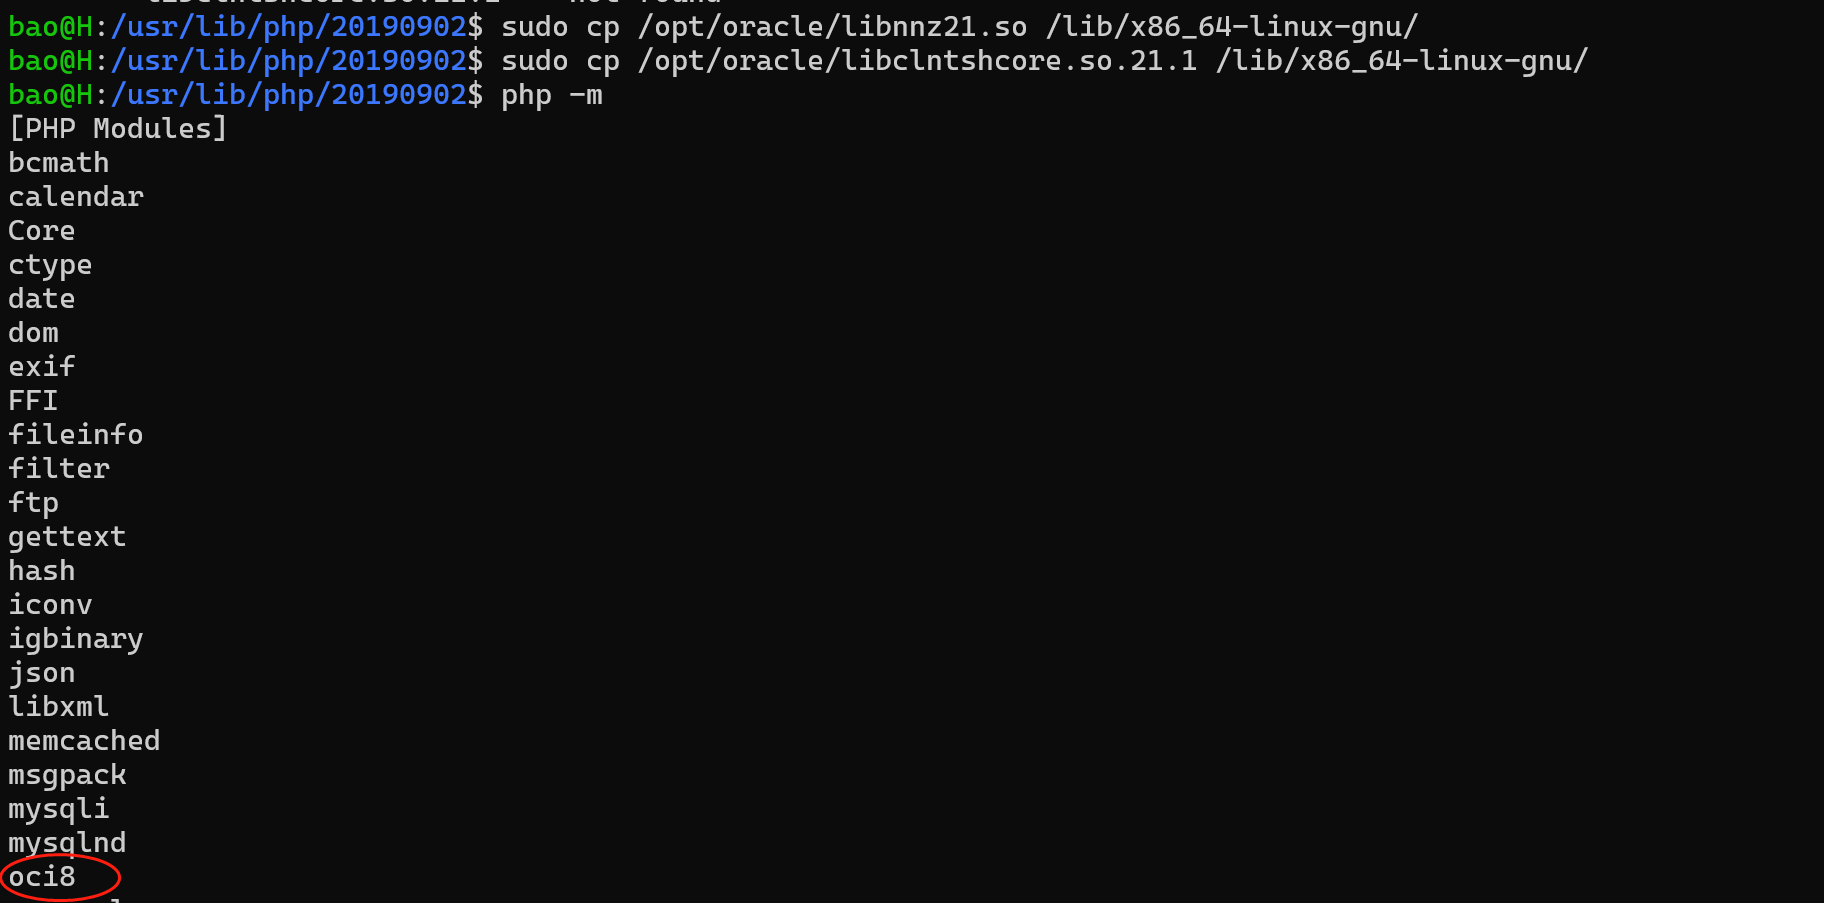
按提示,把 extension=oci8.so 添加到 /etc/php/7.4/fpm/php.ini /etc/php/7.4/cli/php.ini 中,可通过 php -mecho phpinfo() 查看。


遇到的问题:

把缺失的文件拷贝到相应目录即可。

参考:

http://pecl.php.net/package/oci8

WAMPServer 为 Laravel 项目配置 alias

WAMPSever 可以方便的搭建 PHP 运行环境,当我们运行 Laravel 项目时(本地环境),则访问路径 是 http://localhost/项目名称/public ,url 有点长,这还不是主要的, 访问http://localhost/项目名称 ,可以遍历到项目源代码,我们可以把 Apache 服务器的根目录指向项目的 public 目录,这样可以达到隐藏项目源代码的目的,可如果该服务器下有多个 Laravel 项目需要运行,这样做就不现实了, 当然,办法还是有的,可以通过配置 alias 来实现。

假若我们有 Laravel 项目 test, WAMPSwever 的安装目录 D:/wamp64,默认情况下,通过 localhost/test/public 访问项目。

配置 alias :
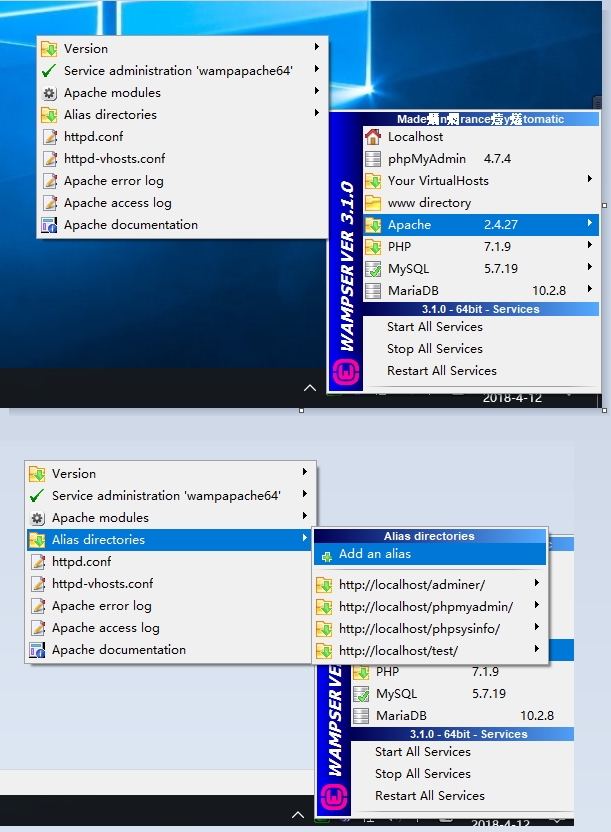
方法1、如下图:

一步一步操作。

方法2:
D:\wamp64\alias 目录下可以看到配置好的三个 alias, 任意复制一个,修改文件名为 test.conf, 修改内容:

1
2
3
4
5
6
7
8
9
10
11
12
13
14
Alias /test "D:/wamp64/www/test/public/"

<Directory "D:/wamp64/www/test/public/">
Options +Indexes +FollowSymLinks
AllowOverride all
<IfDefine APACHE24>
Require local
</IfDefine>
<IfDefine !APACHE24>
Order Deny,Allow
Deny from all
Allow from localhost ::1 127.0.0.1
</IfDefine>
</Directory>

重启所有服务,访问 localhost/test , 可以看到 Laravel 项目的默认欢迎页。

我们在 routes/web.php 中添加一条路由:

1
2
3
Route::get('a',function(){
echo 'A';
});

访问 localhost/test/a , 会出现 404 错误,找不到页面;
访问 localhost/test/index.php/a , 则可以正常访问, 可知 apache 的重写规则没有生效。

alias 译作“别名”,也可称作虚拟目录。 参考 Apache RewriteBase 指令使用介绍 理解,现在我们需要设置 rewrite 的基准目录:
修改 public/.htaccess :

1
2
3
4
5
6
7
....

# Handle Front Controller...
RewriteCond %{REQUEST_FILENAME} !-d
RewriteCond %{REQUEST_FILENAME} !-f
Rewritebase /test
RewriteRule ^ index.php [L]

添加的内容:Rewritebase /test , 正是我们先前配置的 alias.

访问 localhost/test/a, 正常访问。

这种方法不止是对 Laravel 框架有效,对于其他如 ThingPHP 等入口文件 index.php 不在根目录的框架,都可如此设置。
app:transformDexArchiveWithExternalLibsDexMergerForDebug

Android studio 编译项目时,出现如下错误:

1
2
Error:Execution failed for task ':app:transformDexArchiveWithExternalLibsDexMergerForDebug'.
> java.lang.RuntimeException: java.lang.RuntimeException: com.android.builder.dexing.DexArchiveMergerException: Unable to merge dex

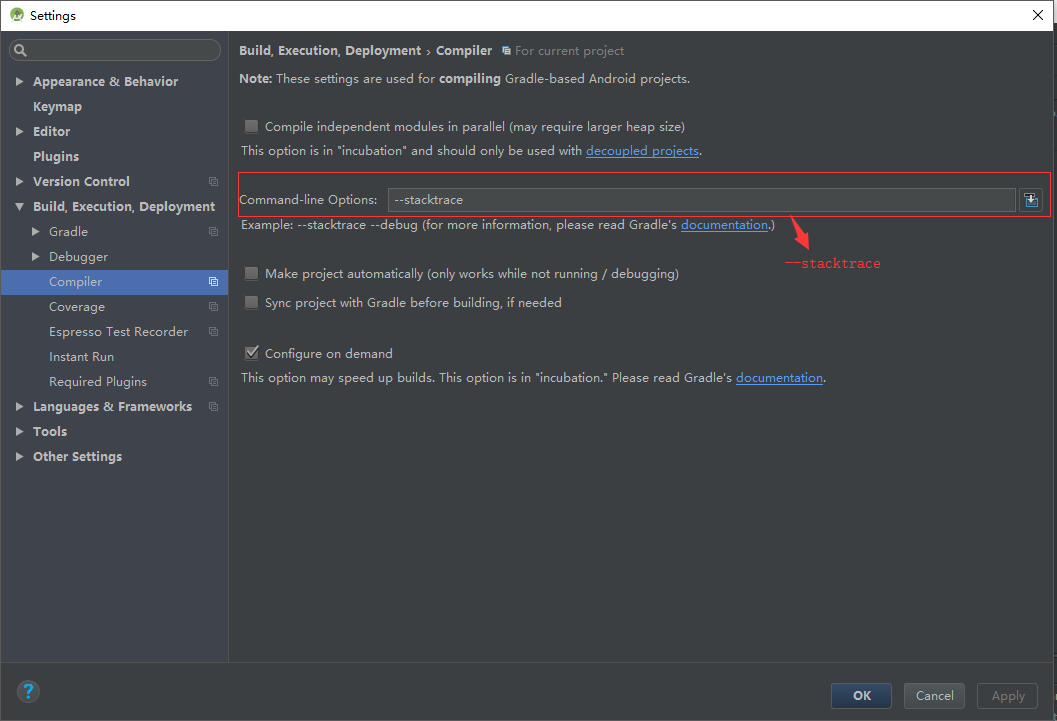
从错误提示信息中很难看出问题出在哪里,去搜索也比较茫然,可对 IDE 做如下设置:

然后重新编译,便可看到相较而言比较详细的错误信息,在这里我遇到的是 65535 问题,解决办法就是使用 MultiDex,官方提供的解决方案。

配置如下:

build.gradle 文件中:

1
2
3
4
5
defaultConfig {
...

multiDexEnabled true
}
1
2
3
4
5
dependencies {
...

implementation 'com.android.support:multidex:1.0.3'
}

自定义 Application 继承自 MultiDexApplication:

1
2
3
4
5
6
public class App extends MultiDexApplication{
@Override
public void onCreate() {
super.onCreate();
}
}

AndroidManifest.xml 中作如下修改:

1
2
3
4
5
6
7
8
9
10
11
12
<application
android:name=".App"
android:allowBackup="true"
android:icon="@mipmap/ic_launcher"
android:label="@string/app_name"
android:roundIcon="@mipmap/ic_launcher_round"
android:supportsRtl="true"
android:theme="@style/AppTheme">

...

</application>

android:name=”.App” ,这里修改为自定义的 Application 即可。