OkHttp Interceptor - Making the most of it

In this blog, we will learn how to work with the OkHttp Interceptors. We will also see the real use cases where we can use it and how we can use it to get the most of it. In Android, we have so many use-cases that can be done using the OkHttp Interceptors.

Today, we will cover the following sections to master it:

  1. What are Interceptors?
  2. Types of Interceptors.
  3. How to add Interceptors in OkHttpClient?
  4. Creating the Interceptor.
  5. Real use-cases using the Interceptors.

What are Interceptors?

According to documentation, Interceptors are a powerful mechanism that can monitor, rewrite, and retry the API call. So basically, when we do some API call, we can monitor the call or perform some tasks.

In simple words, Interceptors are like the security personnel in the security check process at the Airport. They check our boarding pass, put a stamp on it and then would allow us to pass.
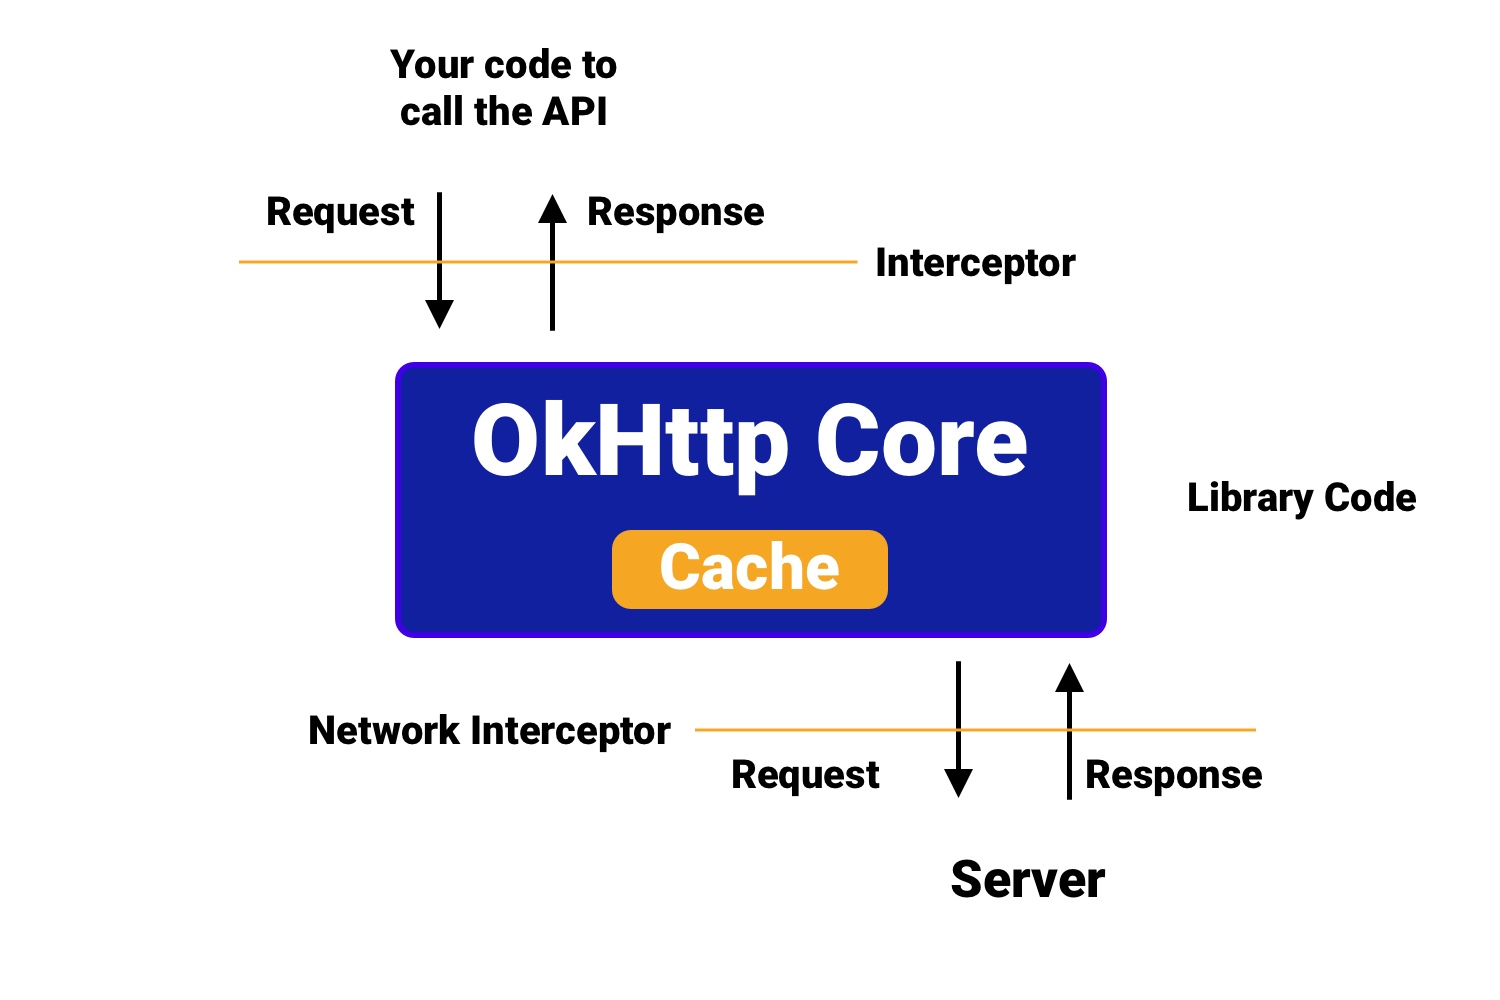
We can use the interceptors to do so many things, for example, monitor the API calls centrally. Generally, we need to add the logger for each network call, but by using the interceptor, we can add one logger centrally and that will work for all the network calls. Another use-case can be caching the response of network calls to build the offline-first app, we will learn it later in this blog in detail.

Types of Interceptors

We have two types of interceptors as follows:

  • Application Interceptors: These are interceptors that are added between the Application Code(our written code) and the OkHttp Core Library. These are the ones that we add using addInterceptor().
  • Network Interceptors: These are interceptors that are added between the OkHttp Core Library and the Server. These can be added to OkHttpClient using addNetworkInterceptor().

How to add interceptors in OkHttpClient?

While building the OkHttpClient object, we can add the interceptor like below:

1
2
3
4
5
fun myHttpClient(): OkHttpClient {
val builder = OkHttpClient().newBuilder()
.addInterceptor(/*our interceptor*/)
return builder.build()
}

Here, in addInterceptor we pass the interceptor that we have created. Now, let’s see how to create the Interceptor.

Creating the Interceptor

To create the interceptor, we need to create a class by implementing the Interceptor interface like below:

1
2
3
4
5
6
7
class MyInterceptor : Interceptor {
override fun intercept(chain: Interceptor.Chain): Response {
/**
* Our API Call will be intercepted here
*/
}
}

Here, in the intercept(), we can perform any action which we want inside it.

And to use the interceptor, we can use like below:

1
2
3
4
5
fun myHttpClient(): OkHttpClient {
val builder = OkHttpClient().newBuilder()
.addInterceptor(MyInterceptor())
return builder.build()
}

We can add the MyInterceptor in addInterceptor().

Now, let’s discuss more real use-cases where we can use the Interceptors.

Real use-cases using the Interceptors

The following are the common use-cases in Android:

Logging the errors centrally

First, we need to create the ErrorInterceptor like below:

1
2
3
4
5
6
7
8
9
10
11
12
13
14
15
16
17
18
19
20
21
22
23
24
25
26
27
class ErrorInterceptor : Interceptor {
override fun intercept(chain: Interceptor.Chain): Response {

val request: Request = chain.request()
val response = chain.proceed(request)
when (response.code()) {
400 -> {
//Show Bad Request Error Message
}
401 -> {
//Show UnauthorizedError Message
}

403 -> {
//Show Forbidden Message
}

404 -> {
//Show NotFound Message
}

// ... and so on

}
return response
}
}
  • First, we get the request from chain.request()
  • Then, we get the response returned from the server, by passing the request in chain.proceed(request)
  • Now, we can check for the response code and perform an action.
  • We can pass the error to the view using via the interfaces or by using something like RxJava, EventBus, and etc.
  • Let’s say if we get a 401 error i.e. Unauthorized then we can perform an action to clear the app data/log out the user or any action which we want to perform.

Now, to use this ErrorInterceptor in our OkHttpClient, we can add like below:

1
.addInterceptor(ErrorInterceptor())

This is how we can create a centralized Error Logger using the Interceptor.

OkHttp has a built-in logger which is very useful for debugging.

To learn more about the built-in logger, click here.

Note: If we want to log the details for the redirection of URL, consider using the interceptor at the network layer using the addNetworkInterceptor().

Caching the response

If we want to cache the response of the API call so that if we call the API again, the response comes out from Cache.

Let’s say we have the API call from Client to Server and Cache-Control header is enabled from the server, then OkHttp Core will respect that header and cache the response for a certain time being which was sent from the server.

But what if the Cache-Control is not enabled from the server. We still can cache the response from OkHttp Client using Interceptor.
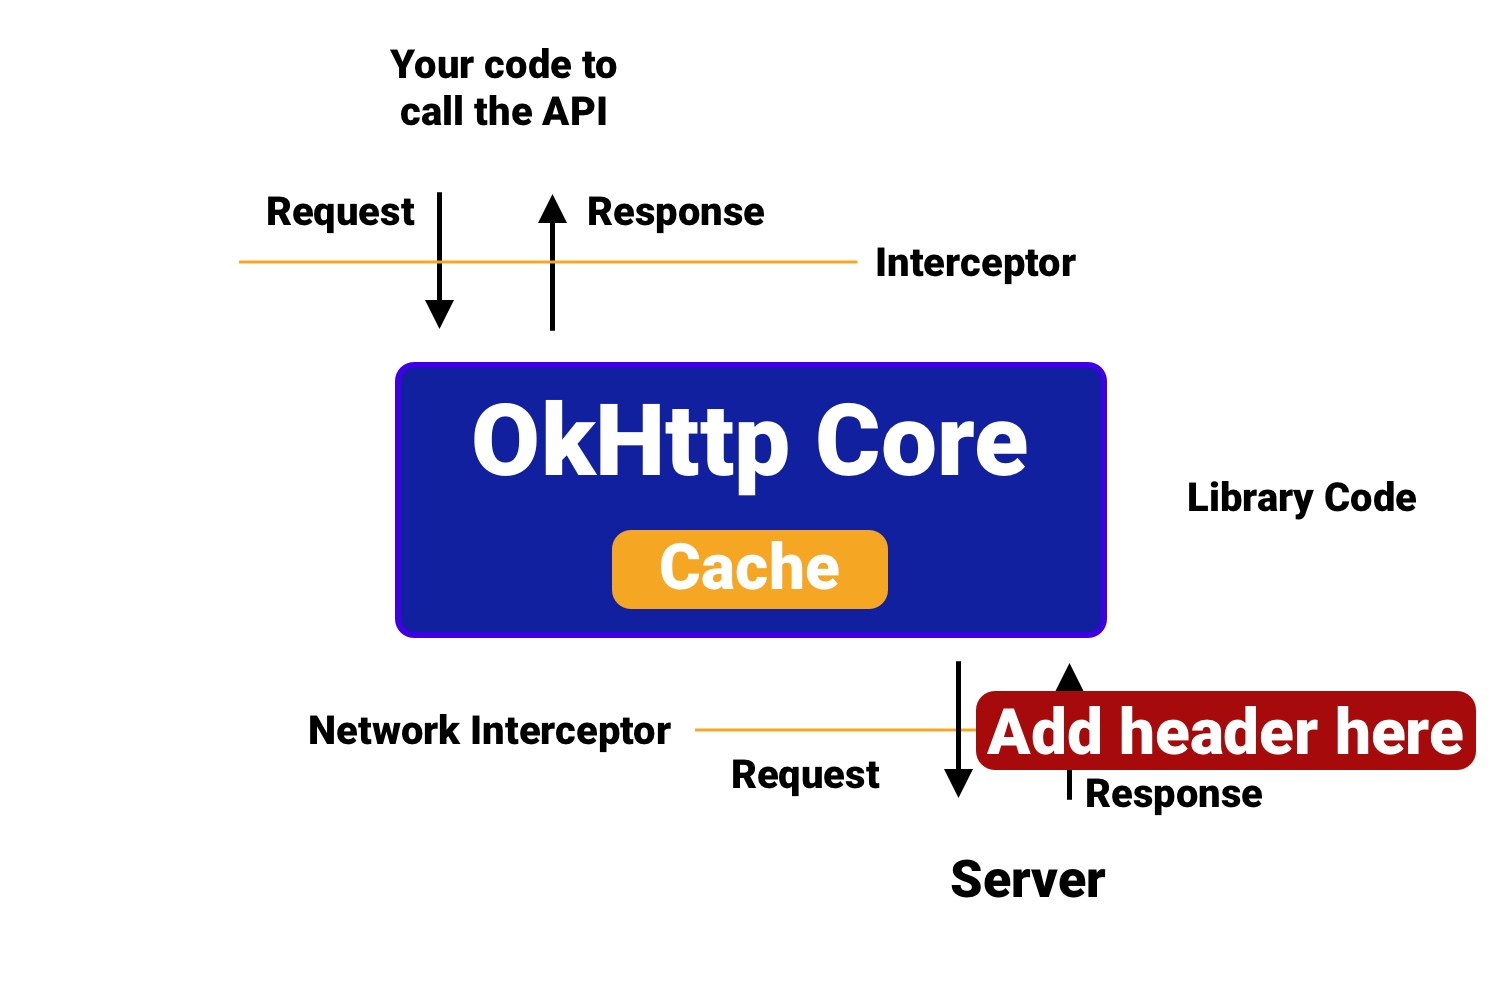
Just see the above image. Here, what we have to do is that we have to intercept the Response before going inside the OkHttp Core and add the header (Cache-Control), so it will be treated as if the response(with the Cache-Control header) has come from the server, and OkHttp Core will respect that and cache the response.

We will create an interceptor like below:

1
2
3
4
5
6
7
8
9
10
11
class CacheInterceptor : Interceptor {
override fun intercept(chain: Interceptor.Chain): Response {
val response: Response = chain.proceed(chain.request())
val cacheControl = CacheControl.Builder()
.maxAge(10, TimeUnit.DAYS)
.build()
return response.newBuilder()
.header("Cache-Control", cacheControl.toString())
.build()
}
}

Here, we have a CacheControl which is used to provide the header for Cache-Control.

Finally, we can add like below:

1
.addNetworkInterceptor(CacheInterceptor())

Here, if we see, we are not using the addInterceptor() but using addNetworkInterceptor() for the use case. This is because in this case, the operation is happening at the network layer.

But, there is something important, we need to consider while building the offline-first app.

The cached response will be returned only when the Internet is available as OkHttp is designed like that.

  • When the Internet is available and data is cached, it returns the data from the cache.
  • Even when the data is cached and the Internet is not available, it returns with the error “no internet available“.

What to do now?

We can use the following ForceCacheInterceptor at the Application layer in addition to the above one (CacheInterceptor, only if not enabled from the server). To implement in the code, we will create a ForceCacheInterceptor like below:

1
2
3
4
5
6
7
8
9
10
class ForceCacheInterceptor : Interceptor {
override fun intercept(chain: Interceptor.Chain): Response {
val builder: Request.Builder = chain.request().newBuilder()
if (!IsInternetAvailable()) {
builder.cacheControl(CacheControl.FORCE_CACHE);

}
return chain.proceed(builder.build());
}
}

We can add the Interceptor in OkHttpClient like below:

1
2
.addNetworkInterceptor(CacheInterceptor()) // only if not enabled from the server
.addInterceptor(ForceCacheInterceptor())

Here, we are adding the ForceCacheInterceptor to OkHttpClient using addInterceptor() and not addNetworkInterceptor() as we want it to work on the Application layer.

Adding the Header like Access Token centrally

Let’s say that we have to make the API calls and we have to add Authorization Header in all the API calls. Either we can use it individually or we can centralize that using the Interceptor.

1
2
3
4
5
6
7
8
9
10
class AuthTokenInterceptor : Interceptor {
override fun intercept(chain: Interceptor.Chain): Response {

val originalRequest = chain.request()
val requestBuilder = originalRequest.newBuilder()
.header("Authorization", "AuthToken")
val request = requestBuilder.build()
return chain.proceed(request)
}
}
  • First, we get the token for the header from our local storage like a SharedPreference.
  • Here, we intercept the original request which we triggered from the application using chain.request() and set it to originalRequest.
  • Then, we build the request again by adding the Header with the key and value which is required to make the network call.
  • Then, we will build the request again and return the response using chain.proceed(request) by passing the new request which is having the Authorization header.

This is how we can centralize the Header which is common in all the API Calls. Now to use it in the OkHttpClient, we will do like below:

1
.addInterceptor(AuthTokenInterceptor())

Let’s go to another use-case.

Refreshing the Access Token at Single Place

Let us say we have a use-case that when we get a 401 error in the Error Interceptor and we need to refresh the auth token as we have an Unauthorized error. We can do that using the below:

1
2
3
4
5
6
7
8
9
10
11
12
13
14
15
16
17
18
19
20
override fun intercept(chain: Interceptor.Chain): Response {

val accessToken = //our access Token
val request = chain.request().newBuilder()
.addHeader("Authorization", accessToken)
.build()
val response = chain.proceed(request)

if (response.code() == 401) {
val newToken: String = //fetch from some other source
if (newToken != null) {
val newRequest = chain.request().newBuilder()
.addHeader("Authorization", newToken)
.build()
return chain.proceed(newRequest)
}
}

return response
}
  • If we get the response.code() as 401 i.e. Unauthorized, we will refresh the token here, then modify the request by adding the new header and make the new request to the server.

Note: Another way that is more flexible when it comes to refreshing the Access Token is to use the Authenticator interface of OkHttp.

Now, let’s move to another use-case.

Enabling Gzip at Android End

Gzip is used for data compression. In Android as well, we can use the Gzip for the compression using the interceptor.

So, while getting a response, OkHttp automatically respects the header (content encoding) and decompresses the data and returns, but let’s say when we have to send compressed data to a server, then we have to write our own interceptor.

We can find the GzipRequestInterceptor class here.

To use the interceptor we can use like below:

1
.addInterceptor(GzipRequestInterceptor())

So, these are the real use-cases, how can we use the interceptors in our Android App. We can do a lot of things with interceptors. Let’s start making the most of it.

来源:

https://blog.mindorks.com/okhttp-interceptor-making-the-most-of-it

windows10 搭建 php 环境

Windows 10 操作系统

下载

https://windows.php.net/download#php-7.3

下载 Non Thread Safe 版本

安装:

比如解压到 D:/php, 在环境变量 Path 中添加 D:/php

进入安装目录,复制 php.ini-development文件, 修改为 php.ini

php.ini 中修改:

新打开 cmdWindows PowerShell 等, 输入 php -v 测试是否成功

开启 Oracel Oci

下载 instant-client:

https://www.oracle.com/cn/database/technologies/instant-client/downloads.html

解压到 D:/OracleClient, 在环境变量 Path 中添加 D:/OracleClient, 在环境变量中添加:

php.ini 中去掉 extension=oci8_12c 前面的分号,

新打开 cmdWindows PowerShell 等, 输入 php -m 测试是否成功

Git 新建项目初始化

Command line instructions

You can also upload existing files from your computer using the instructions below.

Git global setup
1
2
git config --global user.name ""
git config --global user.email ""
Create a new repository
1
2
3
4
5
6
git clone http://127.0.0.1/bao/test.git
cd meeting
touch README.md
git add README.md
git commit -m "add README"
git push -u origin master
Push an existing folder
1
2
3
4
5
6
cd existing_folder
git init
git remote add origin http://127.0.0.1/bao/test.git
git add .
git commit -m "Initial commit"
git push -u origin master
Push an existing Git repository
1
2
3
4
5
cd existing_repo
git remote rename origin old-origin
git remote add origin http://127.0.0.1/bao/test.git
git push -u origin --all
git push -u origin --tags

Oracle 查看某个账户下的表、视图

select * from all_tab_comments – 查询所有用户的表,视图等。

select * from user_tab_comments – 查询本用户的表,视图等。

select * from all_col_comments –查询所有用户的表的列名和注释。

select * from user_col_comments – 查询本用户的表的列名和注释。

select * from all_tab_columns –查询所有用户的表的列名等信息。

select * from user_tab_columns –查询本用户的表的列名等信息。

扩展资料

ORACLE下有三个视图

DBA_TABLES 拥有DBA角色的用户可以查看系统中的所有表

USER_TABLES 登录数据库的当前用户拥有的所有表

ALL_TABLES 登录数据库的当前用户有权限查看的所有表

参考资料:百度百科-Oracle

来源:

https://zhidao.baidu.com/question/2011096311632088908.html

ErrorException : symlink(): Input/output error

在 Windows 10 环境下, 项目中 php artisan storage:link 命令生成软连接,但是访问时总是提示 404 错误,于是远程到 homestead 环境创建软连接:

1
2
3
4
5
6
7
vagrant up

vagrant ssh

cd 项目

php artisan storage:link`

出现如下错误:

1
2
3
4
5
6
7
8
9
10
11
12
13
14
15
16
17
18
19
ErrorException  : symlink(): Input/output error

at /home/vagrant/code/lsapp/vendor/laravel/framework/src/Illuminate/Filesystem/Filesystem.php:228
224| */
225| public function link($target, $link)
226| {
227| if (! windows_os()) {
> 228| return symlink($target, $link);
229| }
230|
231| $mode = $this->isDirectory($target) ? 'J' : 'H';
232|

Exception trace:

1 symlink("/home/vagrant/code/lsapp/storage/app/public", "/home/vagrant/code/lsapp/public/storage")
/home/vagrant/code/lsapp/vendor/laravel/framework/src/Illuminate/Filesystem/Filesystem.php:228

2 Illuminate\Filesystem\Filesystem::link("/home/vagrant/code/lsapp/storage/app/public", "/home/vagrant/code/lsapp/public/storage")

https://laracasts.com/discuss/channels/laravel/symlink-inputouput-error 这里有讨论;用 ln 命令创建还是会报错,

最终,解决方案参照

https://www.cnblogs.com/youji-relog/p/11551532.html

亲测可行。

The following exception is caused by a lack of memory or swap, or not havingswap configured

执行 composer update 出现如下错误:

1
2
3
4
5
6
7
8
Updates: symfony/service-contracts:v2.0.1, symfony/mime:v5.0.2, symfony/css-selector:v5.0.2, symfony/translation-contracts:v2.0.1
- Updating symfony/service-contracts (v1.1.8 => v2.0.1): The following exception is caused by a lack of memory or swap, or not having swap configured
Check https://getcomposer.org/doc/articles/troubleshooting.md#proc-open-fork-failed-errors for details

In Process.php line 344:

[ErrorException]
proc_open(): fork failed - Cannot allocate memory

这一般是出现在低内存的虚拟主机上,解决如下,配置交换内存:

1
2
3
/bin/dd if=/dev/zero of=/var/swap.1 bs=1M count=1024
/sbin/mkswap /var/swap.1
/sbin/swapon /var/swap.1

https://getcomposer.org/doc/articles/troubleshooting.md#proc-open-fork-failed-errors

https://segmentfault.com/a/1190000012533758

composer update: Discard changes [y,n,v,d,s,?]?

composer update 出现如下错误:

1
2
3
4
Package operations: 3 installs, 26 updates, 0 removals
- Updating nesbot/carbon (2.27.0 => 2.28.0): The package has modified files:
M bin/carbon
Discard changes [y,n,v,d,s,?]?

y - discard changes and apply the update

n - abort the update and let you manually clean things up

v - view modified files d - view local modifications (diff)

s - stash changes and try to reapply them after the update

查看源码:https://github.com/composer/composer/blob/master/src/Composer/Downloader/GitDownloader.php#L269-L310

可选择 y, 然后运行 composer require nesbot/carbon --prefer-dist 重新安装。

参考:

https://www.e-learn.cn/content/wangluowenzhang/604410

can not read a block mapping entry; a multiline key may not be an implicit key

1
2
3
4
5
6
7
8
9
10
11
12
13
14
15
16
17
18
19
20
21
22
23
24
25
YAMLException: can not read a block mapping entry; a multiline key may not be an implicit key at line 2, column 5:
date: 2019-08-21 17:19:49
^
at generateError (F:\Document\Blog\helloword\node_modules\js-yaml\lib\js-yaml\loader.js:167:10)
at throwError (F:\Document\Blog\helloword\node_modules\js-yaml\lib\js-yaml\loader.js:173:9)
at readBlockMapping (F:\Document\Blog\helloword\node_modules\js-yaml\lib\js-yaml\loader.js:1073:9)
at composeNode (F:\Document\Blog\helloword\node_modules\js-yaml\lib\js-yaml\loader.js:1359:12)
at readDocument (F:\Document\Blog\helloword\node_modules\js-yaml\lib\js-yaml\loader.js:1519:3)
at loadDocuments (F:\Document\Blog\helloword\node_modules\js-yaml\lib\js-yaml\loader.js:1575:5)
at Object.load (F:\Document\Blog\helloword\node_modules\js-yaml\lib\js-yaml\loader.js:1596:19)
at parseYAML (F:\Document\Blog\helloword\node_modules\hexo-front-matter\lib\front_matter.js:80:21)
at parse (F:\Document\Blog\helloword\node_modules\hexo-front-matter\lib\front_matter.js:56:12)
at Promise.all.spread (F:\Document\Blog\helloword\node_modules\hexo\lib\plugins\processor\post.js:48:20)
at tryCatcher (F:\Document\Blog\helloword\node_modules\bluebird\js\release\util.js:16:23)
at Promise._settlePromiseFromHandler (F:\Document\Blog\helloword\node_modules\bluebird\js\release\promise.js:509:35)
at Promise._settlePromise (F:\Document\Blog\helloword\node_modules\bluebird\js\release\promise.js:569:18)
at Promise._settlePromise0 (F:\Document\Blog\helloword\node_modules\bluebird\js\release\promise.js:614:10)
at Promise._settlePromises (F:\Document\Blog\helloword\node_modules\bluebird\js\release\promise.js:694:18)
at Promise._fulfill (F:\Document\Blog\helloword\node_modules\bluebird\js\release\promise.js:638:18)
at PromiseArray._resolve (F:\Document\Blog\helloword\node_modules\bluebird\js\release\promise_array.js:126:19)
at PromiseArray._promiseFulfilled (F:\Document\Blog\helloword\node_modules\bluebird\js\release\promise_array.js:144:14)
at PromiseArray._iterate (F:\Document\Blog\helloword\node_modules\bluebird\js\release\promise_array.js:114:31)
at PromiseArray.init [as _init] (F:\Document\Blog\helloword\node_modules\bluebird\js\release\promise_array.js:78:10)
at Promise._settlePromise (F:\Document\Blog\helloword\node_modules\bluebird\js\release\promise.js:566:21)
at Promise._settlePromise0 (F:\Document\Blog\helloword\node_modules\bluebird\js\release\promise.js:614:10)

原因: 标题中有方括号,本来想加 [转载] 几个字,居然编译不成功

vue 创建项目

1
vue create <Project Name> //文件名 不支持驼峰(含大写字母)

如果使用 Git Bash ,则使用如下命令:

1
winpty vue.cmd create <Project Name>
1
2
3
4
5
6
7
8
9
10
11
? Check the features needed for your project: (Press <space> to select, <a> to toggle all, <i> to invert selection)
>( ) Babel //转码器,可以将ES6代码转为ES5代码,从而在现有环境执行。
( ) TypeScript // TypeScript是一个JavaScript(后缀.js)的超集(后缀.ts)包含并扩展了 JavaScript 的语法,需要被编译输出为 JavaScript在浏览器运行,
目前较少人再用
( ) Progressive Web App (PWA) Support// 渐进式Web应用程序
( ) Router // vue-router(vue路由)
( ) Vuex // vuex(vue的状态管理模式)
( ) CSS Pre-processors // CSS 预处理器(如:less、sass)
( ) Linter / Formatter // 代码风格检查和格式化(如:ESlint)
( ) Unit Testing // 单元测试(unit tests)
( ) E2E Testing // e2e(end to end) 测试

①是否使用history router:

Vue-Router 利用了浏览器自身的hash 模式和 history 模式的特性来实现前端路由(通过调用浏览器提供的接口)

hash: 浏览器url址栏 中的 # 符号(如这个 URL:http://www.abc.com/#/hello,hash 的值为” #/hello”),hash 不被包括在 HTTP 请求中(对后端完全没有影响),因此改变 hash 不会重新加载页面

history:利用了 HTML5 History Interface 中新增的 pushState( ) 和 replaceState( ) 方法(需要特定浏览器支持)。单页客户端应用,history mode 需要后台配置支持(详细参见:https://router.vuejs.org/zh/guide/essentials/history-mode.html)

② css预处理器主要为css解决浏览器兼容、简化CSS代码 等问题(*Sass诞生于2007年,最早也是最成熟的一款CSS预处理器语言。)

1
2
3
4
5
6
7
8
9
10
11
? Please pick a preset: Manually select features

? Check the features neededforyour project: Router, Vuex, CSS Pre-processors, Linter, Unit

? Pick a CSS pre-processor (PostCSS, Autoprefixer and CSS Modules are supported bydefault):

> SCSS/SASS //Sass安装需要Ruby环境,是在服务端处理的,SCSS 是 Sass3新语法(完全兼容 CSS3且继承Sass功能)
LESS //Less最终会通过编译处理输出css到浏览器,Less 既可以在客户端上运行,
//也可在服务端运行 (借助 Node.js)
Stylus //Stylus主要用来给Node项目进行CSS预处理支持,Stylus功能上更为强壮,
//和js联系更加紧密,可创建健壮的、动态的的CSS。

③ ESLint:提供一个插件化的javascript代码检测工具

1
2
3
4
5
? Pick a linter / formatter config: (Use arrow keys)
> ESLintwitherror prevention only
ESLint + Airbnb config
ESLint + Standard config
ESLint + Prettier //使用较多

④ 何时检测:

1
2
3
? Pick additional lint features: (Press <space> to select, <a> to toggle all, <i> to invert selection)
>( ) Lint on save // 保存就检测
( ) Lint and fix on commit // fix和commit时候检查

⑤ 单元测试 :

1
2
? Pick a unit testing solution: (Use arrow keys)
> Mocha + Chai //mocha灵活,只提供简单的测试结构,如果需要其他功能需要添加其他库/插件完成。必须在全局环境中安装 Jest //安装配置简单,容易上手。内置Istanbul,可以查看到测试覆盖率,相较于Mocha:配置简洁、测试代码简 洁、易于和babel集成、内置丰富的expect

⑥ 如何存放配置 :

1
2
3
? Wheredoyou prefer placing configforBabel, PostCSS, ESLint, etc.? (Use arrow keys)
> In dedicated config files // 独立文件放置
In package.json // 放package.json里

⑦ 是否保存本次配置(之后可以直接使用):

1
? Savethisasa presetforfuture projects? (Y/n)  // y:记录本次配置,然后需要你起个名; n:不记录本次配置

来源:

https://my.oschina.net/u/4203303/blog/3144340