Eloquent: find($id) VS find($array)
Eloquent Model 的 find() 方法根据主键查询模型:
1 | $products = Product::find(1); |
返回某一个 Product:

但是我们也可以将一个ID数组传递给 find() 方法:
1 | $products = Product::find([1, 2, 3]); |
返回一组集合:
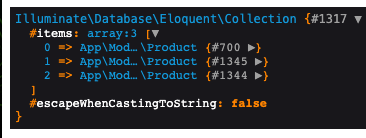
注意: 不能用于查询构造器(Query Builder) 仅用于 Eloquent Models 时有效。
Eloquent: where($key, $value) VS where($conditionsArray)
Eloquent Model 的 where() 方法,常用示例:
1 | $products = Product::query() |
也可以这么写:
1 | $products = Product::query() |
生成如下 sql :
1 | select * from `products` where (`category_id` = 1 and `manufacturer_id` = 2) |
如果使用 “<” 或者 “>” 操作符:
1 | $products = Product::query() |
对应的 sql:
1 | select * from `products` where (`category_id` = 1 and `stock_left` > 100) |
注意 where 后的括号,如果不用数组写法,示例代码如下:
1 | $products = Product::query() |
Session: put($key, $value) VS put($valuesArray)
1 | session()->put('cart', 'Cart information'); |
也可以这么写:
1 | session()->put([ |
类似的,查询特定的 key 是否存在:
1 | session()->has('cart'); |
如果要同时查询多个 key 是否存在呢?可以这么做:
1 | session()->has(['cart', 'cart_total']); |
如果两个键都存在,它将返回true;如果其中任何一个键不存在,则返回false。
Cache: put($key, $value) VS put($valuesArray)
和上面的比较类似。
1 | Cache::put('cart', 'Cart information', 60); |
可以修改为:
1 | Cache::put([ |
Migrations: dropColumn($name) VS dropColumn($columnsArray)
1 | Schema::table('products', function (Blueprint $table) { |
可以修改为:
1 | Schema::table('products', function (Blueprint $table) { |
Gates: has($gate) VS has($gatesArray)
判断用户是否有单一授权:
1 | Gate::has('edit-post') |
如果要判断用户是否同时满足多个授权:
1 | Gate::has(['edit-post', 'delete-post']) |
App: environment($env) VS environment($envArray)
获取当前环境:
1 | App::environment(); |
检查是否 local 环境:
1 | App::environment('local'); |
检查是否是 local 或者 testing 环境:
1 | App::environment(['local', 'testing']); |
原文:https://laraveldaily.com/post/laravel-functions-that-also-accept-array-parameter