This ensures the header collapses as you scroll up and expands on scroll down.
Wrap a LazyColumn and your header in a Box with Modifier.nestedScroll(connection). Tie the header’s height and offset modifiers to the state updated in onPreScroll:
By definition, Scoped functions are functions that execute a block of code within the context of an object.
Well, what does this mean? These functions provide a way to give temporary scope to the object under consideration where specific operations can be applied to the object within the block of code, thereby, resulting in a clean and concise code. Not clear still right? Yeah. In Software Development, things are only better understood by implementing rather than reading. So, let’s go ahead and understand these scoped functions with some examples.
The context of the object can be referred to as “it” or “this” which we will be understanding through examples in this article.
Differentiating scoped functions with examples
There are five scoped functions in Kotlin: let, run, with, also and *apply.* Let’s go through them one by one.
But before going through these examples, let’s consider a Model class “Person”
1 2 3 4 5 6 7 8 9
classPerson() { var name: String = "Abcd" var contactNumber: String = "1234567890" var address: String = "xyz" fun displayInfo() = print("\n Name: $name\n " + "Contact Number: $contactNumber\n " + "Address: $address") }
let
Let’s consider the following function:
1 2 3 4 5 6 7 8
private fun performLetOperation() { valperson= Person().let { return@let"The name of the Person is: ${it.name}" } print(person) } output: The name of the Person is: Abcd
From the above code snippet, we can see that although “let” operation is performed on a Person object, the output of the code is a string value and not the Person object. This implies that the “let” operator provides an option to perform an operation on the current object and return any value based on the use case.
Note: It is not necessary to write “return@let”. This is only done to enhance code readability. In Kotlin, if the last statement in a “let” block is a non-assignment statement, it is by default a return statement. For example:
1 2 3 4 5 6 7 8
private fun performLetOperation() { valperson= Person().let { "The name of the Person is: ${it.name}" } print(person) } output: The name of the Person is: Abcd
The above code also behaves the same way since the last statement is a non-assignment statement. So what happens if we don’t return anything in the “let” block? It is similar to calling a function that has no return value. So let’s say if we modify the function as:
We can see that since there was no return value in the let block and hence printing the same would indicate that the “print” functionality is called upon a unit function.
There are other advantages of using let:
It refers to the context of the object by using the “it” keyword and hence, this “it” can be renamed to a readable lambda parameter.
This can be very helpful if we have nested let blocks, and since all let blocks refer to the context of their respective objects as “it”, it might be difficult for the compiler which objects we are referring to:
The second advantage is it easily helps in providing null checks. Let’s say we make the “name” parameter of the “Person” class nullable and we want to print the name of the person only if it is a not null value, then we can write a clean, simple and concise code as follows:
1 2 3 4 5 6 7
var name: String? = "Abcd" private fun performLetOperation() { valname= Person().name?.let { "The name of the Person is: $it" } print(name) }
We Know how lengthy the code would be to perform a null check in Java. Well, that’s the beauty of kotlin!
“let” can also be used when we want to perform an operation on the result of a call chain. Let’s take the following example:
1 2 3 4 5
fun main() { valnumbers= mutableListOf("One","Two","Three","Four","Five") valresultsList= numbers.map { it.length }.filter { it > 3 } print(resultsList) }
So our aim is to fetch the values in the ArrayList whose length is greater than 3. Since we had to print the result we stored the result in a separate variable and then printed it. But using “let” operator, we can modify the code as:
1 2 3 4 5 6
fun main() { valnumbers= mutableListOf("One","Two","Three","Four","Five") numbers.map { it.length }.filter { it > 3 }.let { print(it) } }
This way we can perform an operation on the result of the call chain.
run
The “run” operator is similar to the “let” operator in terms of accepting a return value that is different from the object on which the scope function is being applied to. Hence, a “run” operator can be used to initialize an object and return the result of it.
1 2 3 4 5 6 7 8 9 10 11
private fun performRunOperation() { Person().run { name = "Asdf" contactNumber = "0987654321" return@run"The details of the Person is: ${displayInfo()}" } } output: Name: Asdf Contact Number: 0987654321 Address: xyz
run vs let
So if run is similar to let in terms of accepting any return value, what’s the difference? The difference is run refers to the context of the object as “this” and not “it”. That is the reason we did not use “${this.name}” as it would be redundant here since the block of code understands that “name” is used here concerning the Person object.
One point here is that since the context is referred to as “this”, it cannot be renamed to a readable lambda parameter. So depending on the use case and requirement we have to choose between the let and the run operator. The “run” operator also helps in easy null checks similar to the “let” operator
1
2
3
4
5
6
7
8
9
var name: String? = "Abcd" private fun performRunOperation() { valname= Person().name?.run { "The name of the Person is: $this" } print(name) } Output: The name of the Person is: Abcd
with
The “with” operator is completely similar to the run operator that we just discussed. It also refers to the context of the object as “this”, similar to how the “run” operator uses it.
1 2 3 4 5 6 7 8
private fun performWithOperation() { valperson= with(Person()) { return@with"The name of the Person is: ${this.name}" } print(person) } Output: The name of the Person is: Abcd
with vs run
So, if “with” is the same as “run”, what’s the difference? How should we choose between these two? Now, this is an interesting case. Let’s consider a case where a Person object can be nullable.
we can see that the context of the object referred to as “this” is a nullable type of Person. And hence, to correct this, we need to change the code as:
So performing a null check using a “with” operator is difficult and this is where we can replace it with “run” as follows:
1 2 3 4 5 6 7 8 9
private fun performRunOperation() { val person: Person? = null person?.run { name = "asdf" contactNumber = "1234" address = "wasd" displayInfo() } }
This looks a lot cleaner.
apply
The apply function is similar to the run functionality only in terms of referring to the context of the object as “this” and not “it” and also in providing null safety checks:
1 2 3 4 5 6 7 8 9
private fun performApplyOperation() { val person: Person? = null person?.apply { name = "asdf" contactNumber = "1234" address = "wasd" displayInfo() } }
“apply” use-case in Android Development
Specifically for Android Development, “apply“ can be useful in many cases. We have many scenarios where we should return an instance of Intent or an Alert Dialog etc., by adding specific attributes to them. Let’s take the example of an intent here:
// Improved approach, by using apply fun createIntent(intentData: String, intentAction: String) = Intent().apply { action = intentAction data= Uri.parse(intentData) }
The improved approach from the above code snippet helps in avoiding variable name redundancy thereby enhancing the code readability and the principle of clean code.
apply vs run
So let’s see the difference between apply and run functions.
We can see that run accepts a return statement whereas **“**apply” does not accept a return statement(we can see the error thrown by the IDE in the image) and always returns the same object which it is referring to.
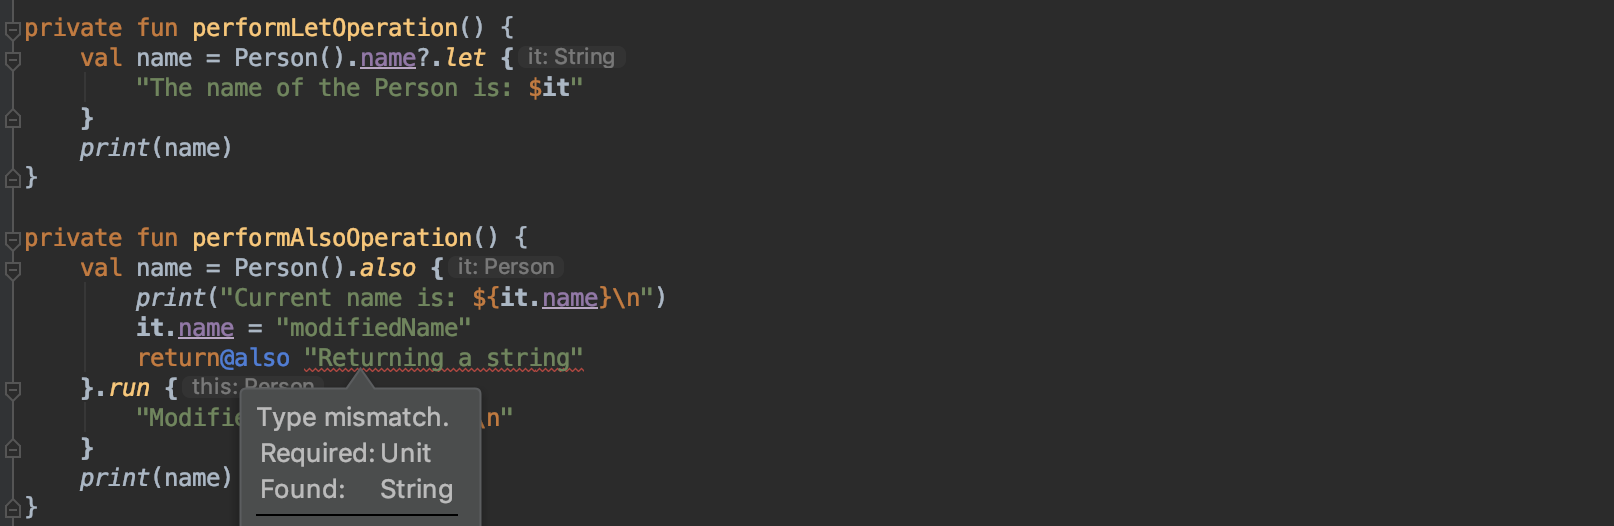
also
The “*also”* function is similar to the *let* functionality only in terms of referring to the context of the object as “it” and not “this” and also in providing null safety checks:
1
2
3
4
5
6
7
8
9
10
11
12
private fun performAlsoOperation() { valname= Person().also { currentPerson -> print("Current name is: ${currentPerson.name}\n") currentPerson.name = "modifiedName" }.run { "Modified name is: $name\n" } print(name) } output: Current name is: Abcd Modified name is: modifiedName
Here we can see the usage of the readable lambda parameters, similar to what we have seen in the “let” operator case. The advantage of using “also” operator is that while doing a chain of operations, this operator helps in evaluating the current operating value if required. Let’s suppose we did not use the “also” operator in the above case, we should have written the code as:
1
2
3
4
5
6
7
varname= Person().name print("Current name is: $name\n") name = "modifiedName" name = name.run { "Modified name is: $name\n" } print(name)
Although this gives the same output, the chain in which the operations are being held is broken and that would not make a good readable code and hence “also” operator is very useful in this case. Hence, by using the also operator, the code can be modified as:
1 2 3 4 5 6 7 8 9
private fun performAlsoOperation() { valname= Person().also { print("Current name is: ${it.name}\n") it.name = "ModifiedName" }.run { "Modified name is: $name\n" } print(name) }
This way we can execute the intermediate result within the execution chain without breaking the chain, thereby leading to a better readable code.
“also” vs “let”
So let’s see the difference between also and let functions.
We can see that let accepts a return statement whereas “also” does not accept a return statement(we can see the error thrown by the IDE in the image) and always returns the same object which it is referring to.
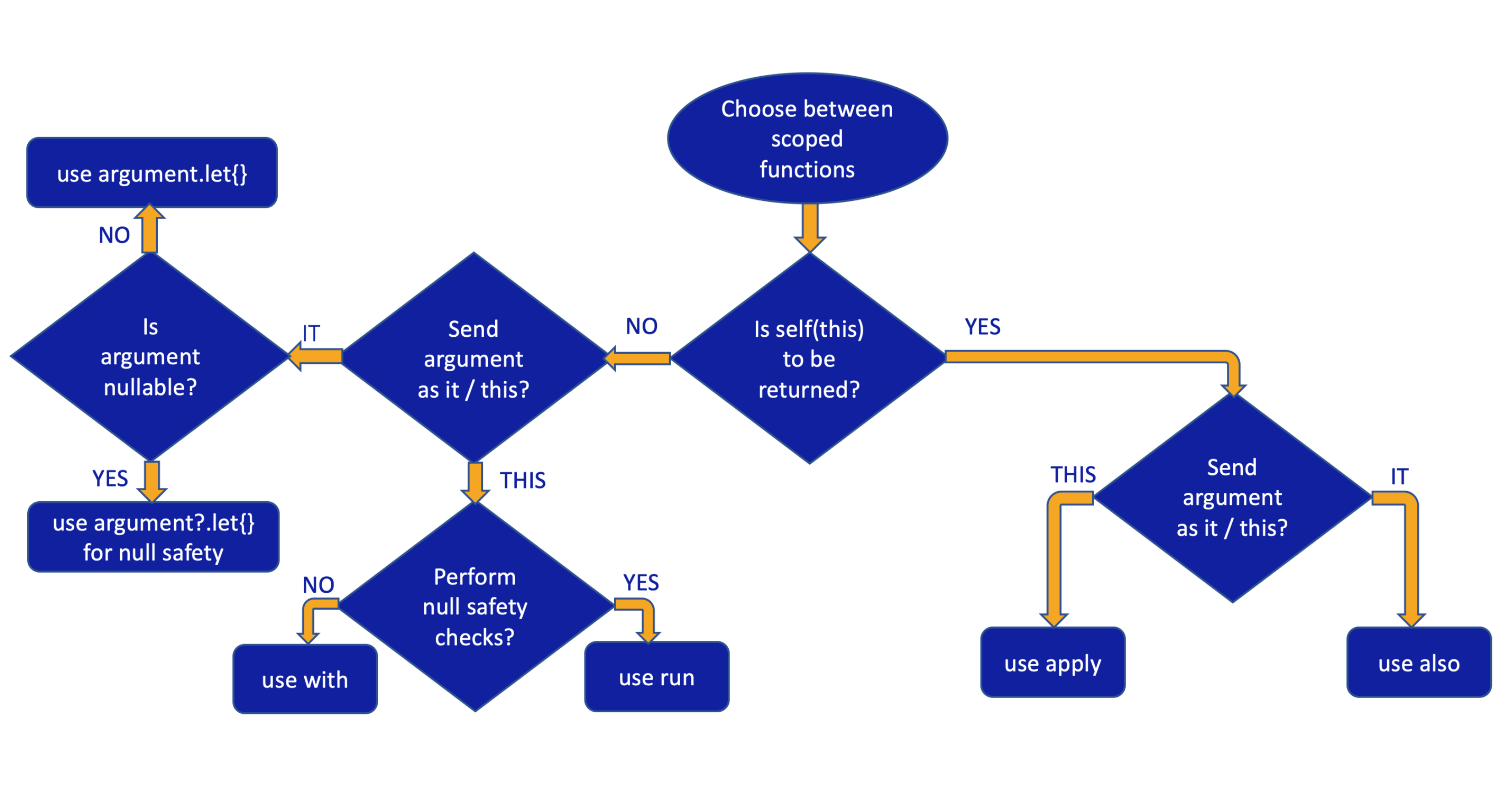
Summary
We can also represent the summary of choosing between the scoped functions as a flowchart.
That’s all about the Scoped functions in Kotlin. Although we might be using this in our code, we hope that our article has given you a clearer way of understanding and implementing the right scoped function in the right place.