Ubuntu 安装 Oracle Instant Client 和 OCI

下载 oracle 的 instantclient https://www.oracle.com/database/technologies/instant-client/linux-x86-64-downloads.html :

1
2
3
4
5
6
7
cd /home/bao

wget https://download.oracle.com/otn_software/linux/instantclient/2111000/instantclient-basic-linux.x64-21.11.0.0.0dbru.zip
wget https://download.oracle.com/otn_software/linux/instantclient/2111000/instantclient-sdk-linux.x64-21.11.0.0.0dbru.zip

unzip instantclient-basic-linux.x64-21.11.0.0.0dbru.zip
unzip instantclient-sdk-linux.x64-21.11.0.0.0dbru.zip

如果没有安装 unzip:

1
apt install unzip

放到 /opt/oracle/ 目录下(可选项):

1
2
3
mkdir /opt/oracle

mv instantclient_21_11/ /opt/oracle/instantclient_21_11/

设置环境变量:

1
export LD_LIBRARY_PATH=/opt/oracle/instantclient_21_11:$LD_LIBRARY_PATH

添加环境变量到 .bashrc,使终端重启时仍然生效:

1
vi ~/.bashrc

在最后一行添加:

1
export LD_LIBRARY_PATH=/opt/oracle/instantclient_21_11:$LD_LIBRARY_PATH

保存后,运行如下命令使其生效:

1
source ~/.bashrc

我选择的 instantclient 需要 glibc 2.14 以上的版本,安装参考 Ubuntu 安装 glibc

可通过如下命令查看 glibc 版本 :

1
ldd --version

下载 oci8 并解压:

1
2
3
4
cd ~
wget https://pecl.php.net/get/oci8-3.3.0.tgz
tar -zxf oci8-3.3.0.tgz
cd oci8-3.3.0

安装 oci8:

1
2
3
4
5
phpize

./configure -with-oci8=shared,instantclient,/opt/oracle/instantclient_21_11

make & make install

成功后的消息:

1
2
3
4
5
6
7
8
9
10
11
12
13
14
15
16
17
18
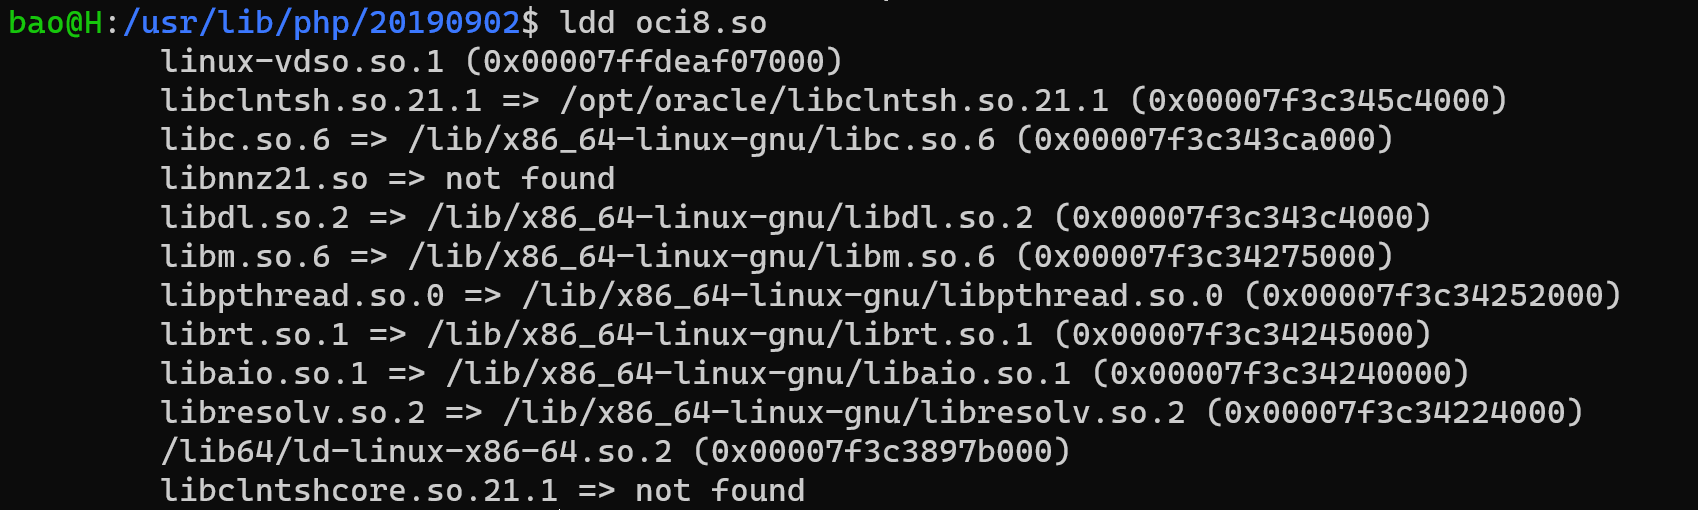
Libraries have been installed in:
/root/oci8-3.3.0/modules

If you ever happen to want to link against installed libraries
in a given directory, LIBDIR, you must either use libtool, and
specify the full pathname of the library, or use the '-LLIBDIR'
flag during linking and do at least one of the following:
- add LIBDIR to the 'LD_LIBRARY_PATH' environment variable
during execution
- add LIBDIR to the 'LD_RUN_PATH' environment variable
during linking
- use the '-Wl,-rpath -Wl,LIBDIR' linker flag
- have your system administrator add LIBDIR to '/etc/ld.so.conf'

See any operating system documentation about shared libraries for
more information, such as the ld(1) and ld.so(8) manual pages.
----------------------------------------------------------------------
Installing shared extensions: /usr/lib/php/20220829/

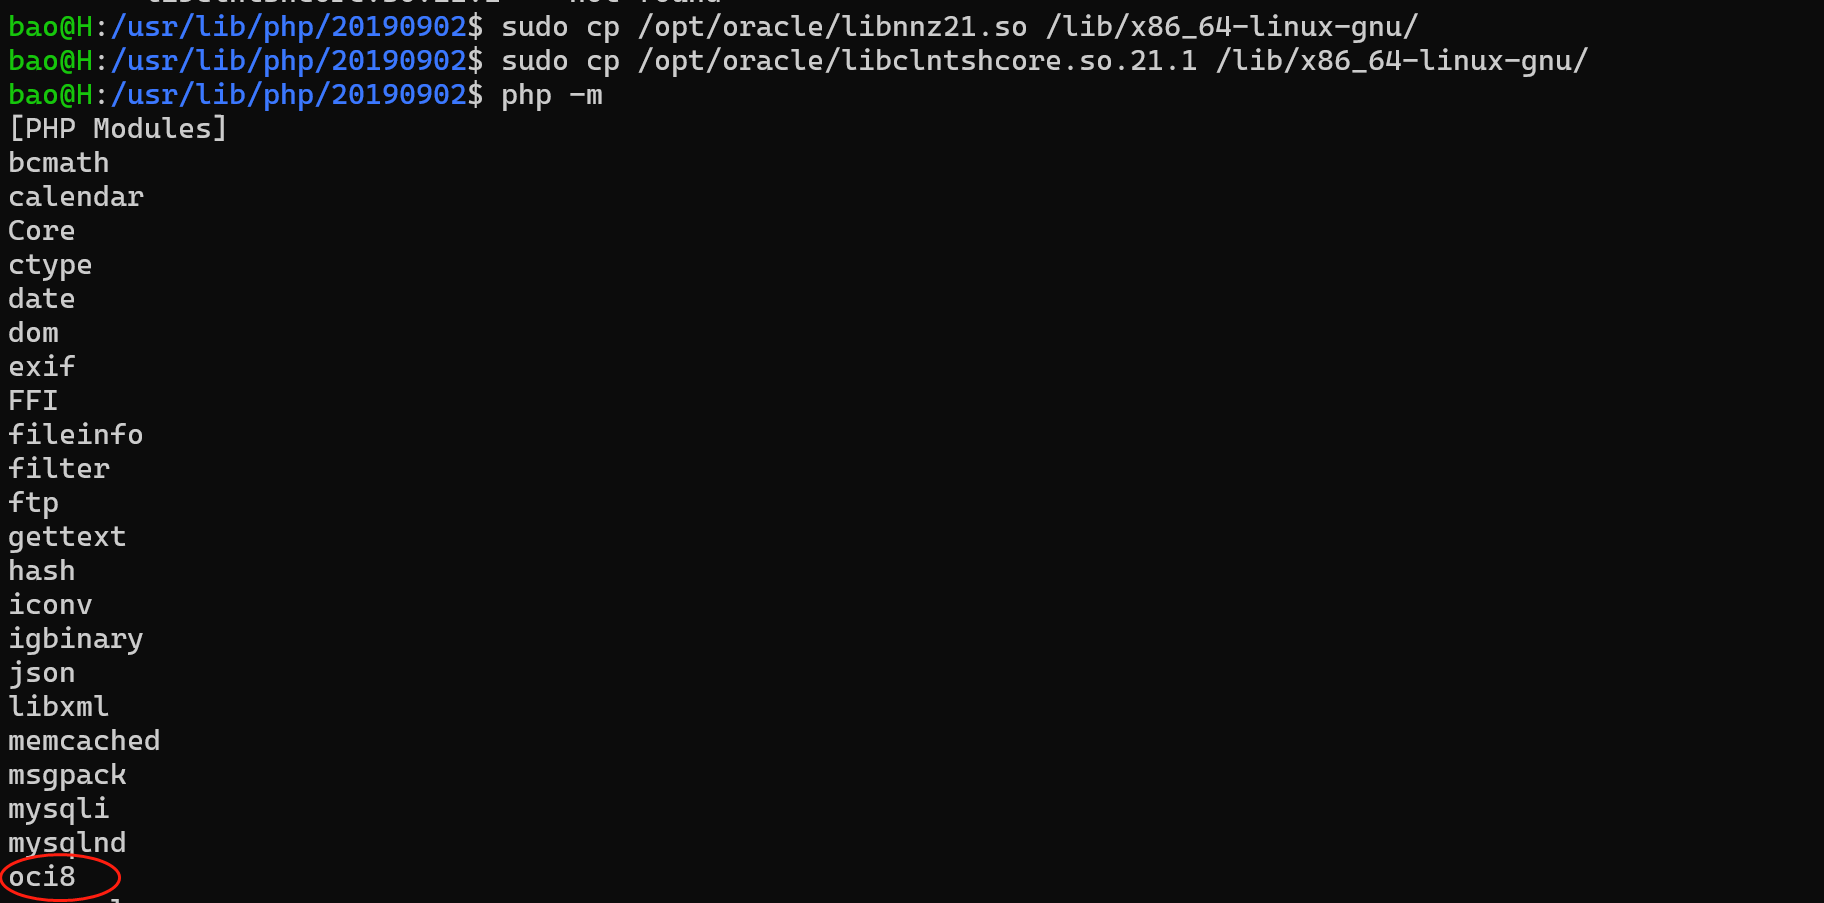
编辑 php.ini,在 【Dynamic Extensions 】后添加如下内容:

1
extension=oci8.so
1
2
vi /etc/php/8.2/cli/php.ini
vi /etc/php/8.2/fpm/php.ini

在 cli 模式下用的好好的,但是部署到服务器后,出现错误 Undefined constant "Yajra\Pdo\OCI_DEFAULT" found ,最后解决方法:

1
2
3
sudo sh -c "echo /opt/oracle/instantclient_21_11 > \
/etc/ld.so.conf.d/oracle-instantclient.conf"
sudo ldconfig

这样总算可以了!!!

参考:

https://pecl.php.net/package/oci8

https://www.php.net/manual/zh/oci8.installation.php

高版本需要安装 glibc 2.14 及以上版本

glibc的安装配置_glibc环境变量

ZIP 文件安装

在官网 http://www.oracle.com/technetwork/topics/linuxx86-64soft-092277.html 下载:Instant Client Package - Basic 和 Instant Client Package - SDK ,我选的版本是Version 21.1.0.0.0,下载 zip 格式的, 由于需要登录,所以最好在桌面电脑下载好,然后上传到 Ubuntu 服务器。我上传到 /opt/oracle 目录,在下载页面的底端,有安装的文档,我也把我安装的过程写出来:

1、解压:

使用 unzip 命令,可通过 sudo apt-get install unzip 安装。

1
2
unzip instantclient-basic-linux.x64-21.1.0.0.0.zip
unzip instantclient-sdk-linux.x64-12.2.0.1.0.zip

解压到的目录是 /opt/oracle

2、创建适合的软连接

libclntsh.solibocci.so 这两文件已经有了,但是发现会报错,删除后,建立软连接:

1
2
3
cd /instantclient_21_1
ln -s libclntsh.so.21.1 libclntsh.so
ln -s libocci.so.21.1 libocci.so

3、安装 oci8

一点准备:

1
2
3
apt-get install make  //为了后面的编译软件使用
apt-get install php-pear //为了得到 pecl 这个程序
apt-get install php7.4-dev //为了得到 phpize 这个程序

运行 sudo pecl install oci8-2.2.0 命令,

出现如上界面,按提示输入:

1
instantclient,/opt/oracle/

回车,不出意外,会安装成功。

按提示,把 extension=oci8.so 添加到 /etc/php/7.4/fpm/php.ini /etc/php/7.4/cli/php.ini 中,可通过 php -mecho phpinfo() 查看。


遇到的问题:

把缺失的文件拷贝到相应目录即可。

参考:

http://pecl.php.net/package/oci8

WAMPServer 为 Laravel 项目配置 alias

WAMPSever 可以方便的搭建 PHP 运行环境,当我们运行 Laravel 项目时(本地环境),则访问路径 是 http://localhost/项目名称/public ,url 有点长,这还不是主要的, 访问http://localhost/项目名称 ,可以遍历到项目源代码,我们可以把 Apache 服务器的根目录指向项目的 public 目录,这样可以达到隐藏项目源代码的目的,可如果该服务器下有多个 Laravel 项目需要运行,这样做就不现实了, 当然,办法还是有的,可以通过配置 alias 来实现。

假若我们有 Laravel 项目 test, WAMPSwever 的安装目录 D:/wamp64,默认情况下,通过 localhost/test/public 访问项目。

配置 alias :
方法1、如下图:

一步一步操作。

方法2:
D:\wamp64\alias 目录下可以看到配置好的三个 alias, 任意复制一个,修改文件名为 test.conf, 修改内容:

1
2
3
4
5
6
7
8
9
10
11
12
13
14
Alias /test "D:/wamp64/www/test/public/"

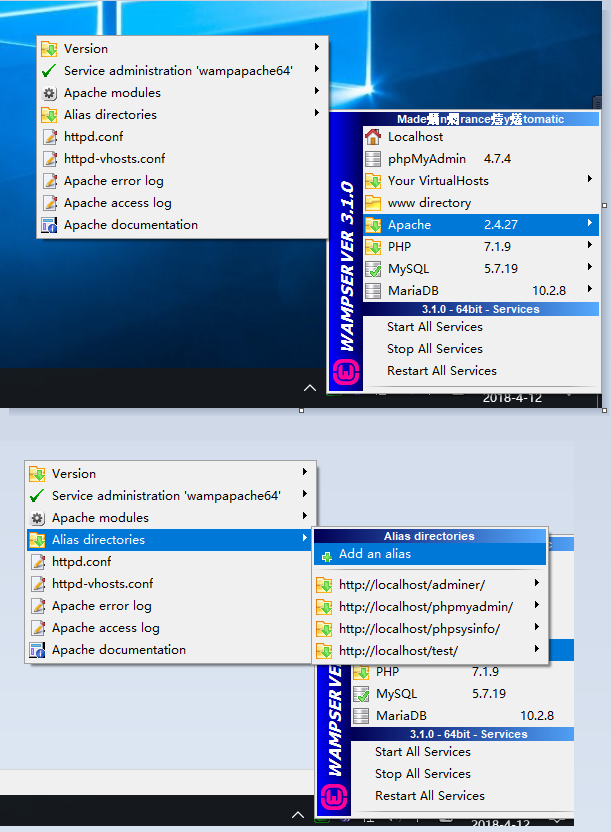
<Directory "D:/wamp64/www/test/public/">
Options +Indexes +FollowSymLinks
AllowOverride all
<IfDefine APACHE24>
Require local
</IfDefine>
<IfDefine !APACHE24>
Order Deny,Allow
Deny from all
Allow from localhost ::1 127.0.0.1
</IfDefine>
</Directory>

重启所有服务,访问 localhost/test , 可以看到 Laravel 项目的默认欢迎页。

我们在 routes/web.php 中添加一条路由:

1
2
3
Route::get('a',function(){
echo 'A';
});

访问 localhost/test/a , 会出现 404 错误,找不到页面;
访问 localhost/test/index.php/a , 则可以正常访问, 可知 apache 的重写规则没有生效。

alias 译作“别名”,也可称作虚拟目录。 参考 Apache RewriteBase 指令使用介绍 理解,现在我们需要设置 rewrite 的基准目录:
修改 public/.htaccess :

1
2
3
4
5
6
7
....

# Handle Front Controller...
RewriteCond %{REQUEST_FILENAME} !-d
RewriteCond %{REQUEST_FILENAME} !-f
Rewritebase /test
RewriteRule ^ index.php [L]

添加的内容:Rewritebase /test , 正是我们先前配置的 alias.

访问 localhost/test/a, 正常访问。

这种方法不止是对 Laravel 框架有效,对于其他如 ThingPHP 等入口文件 index.php 不在根目录的框架,都可如此设置。

Laravel timestamp

博客数据库中有个 published_at 字段,主要是为了实现延迟发布的功能,但发现每次查看博文时,published_at 都会自动更新,打开博文时,唯一做的更新操作是为了统计浏览量: $post->increment('view_count',1);, SQL 如下:

1
update `posts` set `view_count` = `view_count` + 1, `updated_at` = '2017-08-17 18:30:33' where `id` = '1' and `posts`.`deleted_at` is null

并没有做更新 published_at 的操作呀?

后来去数据库查看字段设置,发现 published_at 默认勾选了 根据当前时间戳更新,而 created_atupdate_at 却默认没有勾选根据当前时间戳更新,而 created_atupdate_at 是同过 $this->timestamps() 生成的,于是查看 timestamps() 源码:

1
2
3
4
5
6
public function timestamps()
{
$this->timestamp('created_at')->nullable();

$this->timestamp('updated_at')->nullable();
}

原来这俩个字段默认设置允许为空,而我建立数据表是这样写的$table->timestamp('published_at'); ,默认不为空,于是做修改 $this->timestamp('published_at')->nullable(); ,解决问题。

可知, MySQL 中,timestamp 类型的字段,如果不允许为空,那么 mysql 会自动维护,所有的更新操作都会引起该字段值的改变。

app:transformDexArchiveWithExternalLibsDexMergerForDebug

Android studio 编译项目时,出现如下错误:

1
2
Error:Execution failed for task ':app:transformDexArchiveWithExternalLibsDexMergerForDebug'.
> java.lang.RuntimeException: java.lang.RuntimeException: com.android.builder.dexing.DexArchiveMergerException: Unable to merge dex

从错误提示信息中很难看出问题出在哪里,去搜索也比较茫然,可对 IDE 做如下设置:

然后重新编译,便可看到相较而言比较详细的错误信息,在这里我遇到的是 65535 问题,解决办法就是使用 MultiDex,官方提供的解决方案。

配置如下:

build.gradle 文件中:

1
2
3
4
5
defaultConfig {
...

multiDexEnabled true
}
1
2
3
4
5
dependencies {
...

implementation 'com.android.support:multidex:1.0.3'
}

自定义 Application 继承自 MultiDexApplication:

1
2
3
4
5
6
public class App extends MultiDexApplication{
@Override
public void onCreate() {
super.onCreate();
}
}

AndroidManifest.xml 中作如下修改:

1
2
3
4
5
6
7
8
9
10
11
12
<application
android:name=".App"
android:allowBackup="true"
android:icon="@mipmap/ic_launcher"
android:label="@string/app_name"
android:roundIcon="@mipmap/ic_launcher_round"
android:supportsRtl="true"
android:theme="@style/AppTheme">

...

</application>

android:name=”.App” ,这里修改为自定义的 Application 即可。

Laravel:系统登录后的跳转

Laravel 自带的 Auth,在登陆或注册成功后,会跳转到 /home, 但是我们的项目有时会划分前、后台,而只有后台需要登陆,则需要修改跳转路径到后台根目录,在Controllers\Auth 目录下,修改 LoginController.phpRegisterController.php,ResetPasswordController.php 中的 $redirectTo 参数:

1
protected $redirectTo = '/admin';

但还是没有完成,比如我们在浏览器中打开系统后台,会跳转到登录界面,输入账号密码登陆,成功后,我们不退出系统,不关闭浏览器,只关闭当前标签页(实际操作中就可能出现这种情况),还没做事呢!于是重新打开系统,这次不会出现登陆界面,因为我们已登录了, session 还没过期,但是也没有正常进入后台,而是跳转到了 /home,所以我们还需做一点修改,在 Middleware 目录下,有 RedirectIfAuthenticated.php 这个文件,根据名称可以看出,是用来控制系统已经登陆后的跳转,修改文件中的跳转路径:

1
2
3
if (Auth::guard($guard)->check()) {
return redirect('/admin');
}

PhpStorm 从已有文件创建项目

从欢迎页开始创建:

从主页面开始创建:

接下来为了简便期间,可以选择最后一项,然后点击Next,
主要是这里,按图片上标示的顺序操作即可:

如上图,先在文件目录中选择项目文件,然后设置为Project Root,Next 按扭变为可用,点击即可。

Setup is unable to find the "ifconfig" program on your machine

VMware 安装 Ubuntu,之后安装 VMware Tools ,安装过程中可能遇到如下提示:

1
Setup is unable to find the "ifconfig" program on your machine.  Please make sure it is installed.  Do you want to specify the location of this program by hand? [yes]

输入 yes ,按 Enter 键确认,或直接 按 Enter 键,则会有如下提示:

1
What is the location of the "ifconfig" program on your machine?

Enter 键,会有如下提示:

1
The answer "" is invalid.  It must be the complete name of a binary file.

不能正常安装。

输入 no ,按 Enter 键,则会有如下提示:

1
Unable to continue.

Execution aborted.
`
直接退出安装。

解决办法 :

运行以下命令安装 ifconfig

1
sudo apt install net-tools

然后再次安装 VMware Tools 即可。

Android:DatePickerDialog

DatePickerDialog 用来设置日期。基本用法:

1
2
3
4
5
6
7
8
9
10
11
12
13
14
15
Calendar mCalendar = Calendar.getInstance();
//格式化日期
SimpleDateFormat format = new SimpleDateFormat("yyyy-MM-dd");

DatePickerDialog pickerDialog = new DatePickerDialog(this, new DatePickerDialog.OnDateSetListener() {

@Override
public void onDateSet(DatePicker arg0, int year, int month, int day) {
mCalendar.set(year, month, day);//将点击获得的年月日获取到calendar中。
Toast.makeText(this, format.format(mCalendar.getTime()),Toast.LENGTH_LONG).show();
}
},mCalendar.get(Calendar.YEAR), mCalendar.get(Calendar.MONTH), mCalendar.get(Calendar.DAY_OF_MONTH));
//设置最大可选日期
pickerDialog.getDatePicker().setMaxDate((new Date()).getTime());
pickerDialog.show();

把上述代码放在 viewclick 时间监听中便可触发,并且默认选择的日期是当前日期。

但在实际应用中,我们可能需要默认显示的是传来的值,如生日等,如何做?

上面代码中,在实例化 DatePickerDialog 时传入的 mCalendar.get(Calendar.YEAR), mCalendar.get(Calendar.MONTH), mCalendar.get(Calendar.DAY_OF_MONTH) ,便是用来设置默认选择的日期,我们可以把传来的日期转化为 Calendar 对象即可,代码如下:

1
2
3
4
5
6
7
8
9
10
11
12
13
14
15
16
17
18
19
20
21
22
23
24
25
Calendar mCalendar = Calendar.getInstance();
//格式化日期
SimpleDateFormat format = new SimpleDateFormat("yyyy-MM-dd");

String str = "1988-11-11"; //这是可以是传来的日期,也可从 `view`获取
if (str != null){
try {
Date date = format.parse(str);
mCalendar.setTime(date);
} catch (ParseException e) {
e.printStackTrace();
}
}

DatePickerDialog pickerDialog = new DatePickerDialog(this, new DatePickerDialog.OnDateSetListener() {

@Override
public void onDateSet(DatePicker arg0, int year, int month, int day) {
mCalendar.set(year, month, day);//将点击获得的年月日获取到calendar中。
Toast.makeText(this, format.format(mCalendar.getTime()),Toast.LENGTH_LONG).show();
}
},mCalendar.get(Calendar.YEAR), mCalendar.get(Calendar.MONTH), mCalendar.get(Calendar.DAY_OF_MONTH));
//设置最大可选日期
pickerDialog.getDatePicker().setMaxDate((new Date()).getTime());
pickerDialog.show();

打开日期对话框时,默认选择的便是 1988-11-11

Ubuntu 搭建 git server

假设服务器 ip 地址为 192.168.1.1

1、安装 git:

1.1 安装:

1
2
sudo apt-get update
sudo apt-get install git-core

1.2 创建 git 仓库目录:

1
2
cd /home
mkdir git

1.3 创建密钥存放目录:

1
2
cd /home/git
mkdir .ssh

2、新建 git 用户,用来管理 git 服务:

1
sudo adduser git

3、创建证书登陆:

3.1 安装 openssh-server:

1
sudo apt-get install openssh-server

通过命令 s –e|grep ssh ,查看ssh服务是否启动(是否安装成功)

3.2 在本机(客户端)生成证书:

我用的是 Windows, 打开 git bash,用如下命令生成:

1
ssh-keygen –t rsa 

C:\Users\用户名\.ssh 目录可看到:

1
2
id_rsa.pub     #公钥
id_ras #私钥

3.3 把证书上传到 git 服务器:

C:\Users\用户名\.ssh 目录下打开 git bash:

1
scp id_rsa.pub root@192.168.1.1:/home/git/.ssh

3.4 服务器端密钥配置:

进入 /home/git/.ssh 目录:

1
cd /home/git/.ssh

如果 authorized_kesys 不存在,则重新生成:

1
touch authorized_kesys

将客户端上传的公钥id_rsa.pub的内容追加到authroized_keys中:

1
cat id_rsa.pub >> authorized_keys

4、初始化 git 仓库:

修改git目录的用户/用户组:

1
sudo chown -R git:git git

初始化:

1
2
3
cd /home/git

sudo git init --bare sample.git

5、禁用 shell 登陆:

打开 /etc/passwd 文件,找到 git用户,把 git:x:1000:1000::/home/git: 修改为:

1
git:x:1000:1000::/home/git:/usr/bin/git-shell

6、克隆仓库:

在客户端打开 git bash:

1
git clone git@192.168.1.1:/home/git/sample.git

结束!!!


资料参考:

搭建Git服务器 - 廖雪峰
在 Ubuntu 系统中部署 Git Server
如何在Ubuntu上几步搭建Git Server
Ubuntu上搭建Git服务器
ssh证书登录(实例详解)

Windows 下 VisualSVN 配置钩子(post-commit)

在实际项目中,一般都要用到版本控制工具。这篇文章是关于版本控制工具 VisualSVN,对于网站(在线系统)类项目,我们在 commit 的同时,也希望新提交的代码能自动部署到服务器目录,便要用到钩子(hook)功能,具体配置的是 post-commit,如下图:

在 windows server 服务器安装 VisualSVN server 服务端和 TortoiseSVN客户端,创建 repository,略过不提。

在项目名称点击鼠标右键,选择“Properties”->选择“Hooks”选项卡,选中 “Post-commit hook” ,点击 “Edit”,编辑内容如下:

1
2
3
4
5
6
7
@echo off  
SET REPOS=%1
SET REV=%2
SET DIR=%REPOS%/hooks
SET PATH=%PATH%;
SET WORKING_COPY="C:/wamp64/www/test"
svn update %WORKING_COPY% --username username --password password

其中, WORKING_COPY 是项目在服务器(这里指如Apache、Nginx等web服务器)中的目录,并且是svn目录,这里要做的是:右键,签出(checkout)项目,而不是右键新建目录,这也是为何要安装TortoiseSVN的原因。

这是,在自己的电脑上新建、修改文件,然后提交到版本库,可能出现如下错误:

1
2
3
4
5
post-commit hook failed (exit code 1) with output:
svn: E155004: Working copy 'C:\wamp64\www\test' locked
svn: E200031: sqlite: attempt to write a readonly database
svn: run 'svn cleanup' to remove locks (type 'svn help cleanup' for details)

原因: Visual SVN Server服务的执行权限不够,不能对指定目录做读写操作。

解决办法:,修改Visual SVN Server 权限

 按 `win+R`快捷键,  在运行窗口中输入` services.msc`, 回车,在弹出的“服务”窗口中, 找到visual svn server 服务 ,右键属性 ,先停止服务之后,设置如下: