一、数据库连接
Laravel 模型中可以通过修改 $connection 属性设置设置数据库连接:
1
2
3
4
| class Post extends Model
{
protected $connection = 'mysql2';
}
|
二、数据表名称
前面的文章中说过,一个模型对应一张数据表,默认约定数据表名称是模型名称复数的小写,例如 Post 默认对应数据表 posts, User 默认对应数据表 users,如果不符合这个规则,则要指定数据表名称,在模型中使用 $table 属性指定数据表名称:
1
2
3
4
| class Post extends Model
{
protected $table = 'posts';
}
|
三、主键
无论是通过 php artisan make:model Post -m 或者 php artisan make:migration create_posts_table 创建的默认迁移文件:
1
2
3
4
| Schema::create('posts', function (Blueprint $table) {
$table->id();
$table->timestamps();
});
|
其中 $table->id() 生成的就是自增主键 id,如果要使用 uuid ,则可以使用 $table->uuid() ,如果要修改默认名称 uuid,可以这样做 $table->uuid('id') :
默认主键名称为 id,如果是其他名称,则应通过修改 $primaryKey 指定:
1
2
3
4
| class Post extends Model
{
protected $primaryKey = 'uuid';
}
|
默认主键是自增的整数,如果你的项目总主键不是自增,则应修改 $incrementing 属性:
1
2
3
4
| class Post extends Model
{
protected $incrementing = false;
}
|
如果主键不是 integer 类型,比如使用的是 uuid,则应修改 $keyType 属性,指定数据类型:
1
2
3
4
| class Post extends Model
{
protected $keyType= 'string';
}
|
四、时间戳
数据库迁移表中的 $table->timestamps() 会生成两个时间戳字段 created_at 和 updated_at (框架会自动维护这两个字段的值变更),如果不需要这两个字段,则应修改 $timestamps 属性禁用:
1
2
3
4
| class Post extends Model
{
protected $timestamps = false;
}
|
如果要自定义这个连个字段名称,例如:
1
2
3
4
5
| class Post extends Model
{
const CREATED_AT = 'creation_date';
const UPDATED_AT = 'updated_date';
}
|
五、fillable,hidden
可以查看默认的 User 模型:
1
2
3
4
5
6
7
8
9
10
11
12
13
| class User extends Authenticatable
{
protected $fillable = [
'name',
'email',
'password',
];
protected $hidden = [
'password',
'remember_token',
];
}
|
先举个例子:
1
2
3
4
5
6
7
8
9
10
11
12
13
14
15
16
17
18
19
20
21
| <?php
namespace App\Http\Controllers;
use App\Models\User;
use Illuminate\Http\Request;
use Illuminate\Support\Facades\Hash;
use Illuminate\Support\Str;
class UserController extends Controller
{
public function create()
{
User::create([
'name' => '张三',
'email' => 'zhangsan@qq.com',
'password' => Hash::make('zhangsan'),
'remember_token' => Str::random(40)
]);
}
}
|
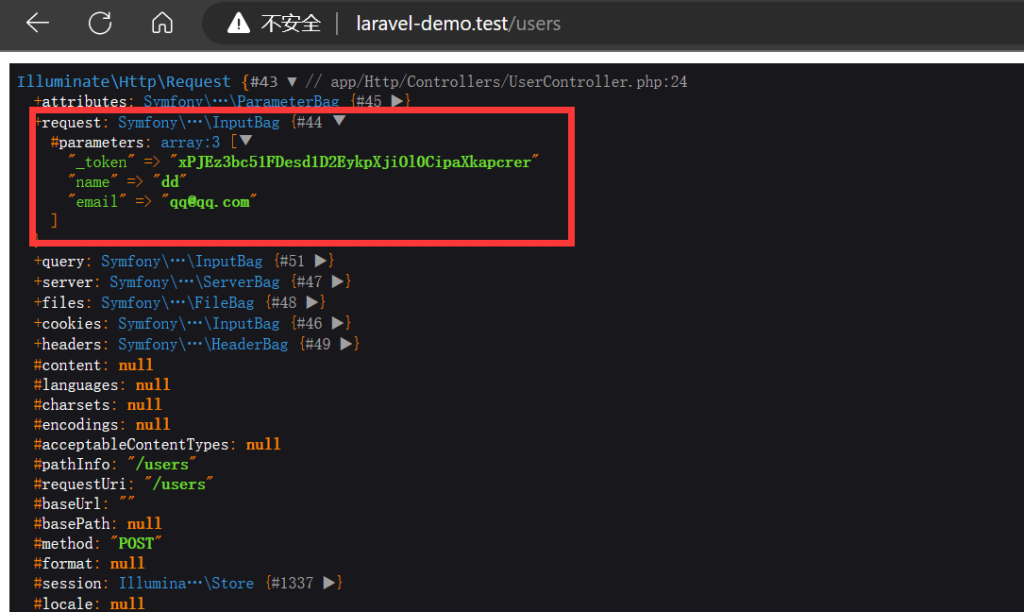
这样创建模型时,remember_token 不会被保存到数据库中,这便是 $fillalbe 的作用,指定那些属性可以批量赋值。
1
2
3
4
5
6
7
8
9
10
11
12
13
14
15
16
17
18
19
20
21
22
23
| <?php
namespace App\Http\Controllers;
use App\Models\User;
use Illuminate\Http\Request;
use Illuminate\Support\Facades\Hash;
use Illuminate\Support\Str;
class UserController extends Controller
{
public function create()
{
$user = User::create([
'name' => '张三',
'email' => 'zhangsan@qq.com',
'password' => Hash::make('zhangsan'),
'remember_token' => Str::random(40)
]);
return $user;
}
}
|
访问 http://laravel-demo.test/users/create 查看结果:
1
2
3
4
5
6
7
| {
"name": "张三",
"email": "zhangsan@qq.com",
"updated_at": "2022-12-16T10:40:11.000000Z",
"created_at": "2022-12-16T10:40:11.000000Z",
"id": 1
}
|
$hidden 属性指定模型序列化时(生成json)时隐藏哪些字段,可以修改 $hidden 属性中的字段,再次访问对比结果。
参考文档:
Eloquent 模型约定:https://learnku.com/docs/laravel/9.x/eloquent/12251#e5bc93
批量赋值:https://learnku.com/docs/laravel/9.x/eloquent/12251#c7d398
Demo:https://github.com/hefengbao/laravel-demo